Archive

final cut pro

In which I transcribe some notes on how the BBC uses Apple’s Final Cut Studio suite to make TV programmes.

I thought it would only take a day, but tomorrow I’m going back for more!

Trade shows bring out the worst in me. In recent years I’ve learned to do without them. However this time I have a couple of new reasons to go to an exhibition featuring Avid, Sony, Canon, Panasonic et al. demoing software and kit for post-production.

I spent the day at the Broadcast Video Expo here in London. I haven’t been in three years, so was expecting economic considerations to reduce the number of stands and attendees. I was wrong on both counts. The show isn’t huge, but it was big enough to be worth attending, and small enough to look very busy for the number of people there.

Here’s a picture I posted using my iPhone/Twitter/Twitpic/TwitterFon (!):
A busy Broadcast Video Expo 2009

Today was a day of seminars, starting with the BBC on how they use Final Cut Studio for HD workflow. They concentrated on Final Cut Pro’s links with Color. Here are my live tweets from today, with extra notes.

100:1 shooting ratio: Offline at dv res. 100 hrs=1.2Tb
– For documentaries, the shooting ratio ranges from 100:1 to 200:1. That is too much for anything other than DV resolution. 100hrs of DV rushes is only 1.2TB

HDcam not great. Avid worth it if time pressure is high.
– Problems with HDCam tapes. Using Adrenaline/Nitris etc. workflow is fine, but not worth the extra cost unless you have a very tight transmission deadline.

Mouse based colour tools not great. Like control surfaces.
– The Avid colour correction tools they used had to use mouse/keyboard and bright screens. Darker displays and control surfaces are much better

Apple Color is good option. Stable version of Final Touch
– BBC used Final Touch before Apple bought it. Worth the high price, but not reliable. They thought Apple were right not to change anything but improve the reliability. Now any problems are due to operator error, so allow for a couple of extra rendering hours in case something goes wrong overnight.

Use Apple ProRes as equivalent of Avid dnxhd. 6:1 ratio.

Docs need too much storage for uncompressed – can’t delete footage – producers always coming back with changes
– As HD takes so much storage, rushes need to be removed to backup. That is bad news for docs. Producers and directors are always coming back with a couple of little changes every few days. That doesn’t work well with high-end systems.

Apple Color doesn’t roundtrip well. Export full res qt from fcp, grade in color and bring back into fcp.
– Export ProRes QuickTime from Final Cut timeline. Import that QuickTime onto a new video layer in your project. Use the blade tool to slice your movie at each edit point in your timeline. Delete your original clips. Send to Color. Correct in Color. One problem is that you can’t correct Picture-in-picture sequences this way. You need to 3-Way Color Correct these in Final Cut relative to the background picture before you export to QuickTime. Once the grade is ‘over’ export at ProRes QT and return to Final Cut for captioning.

Grade in Color in 20 minute sections
– This is the most stable way to use Color, a figure determined by trial and error and talking to Apple.

Apple Color one flaw for pros: can’t get sound cues. Color is mute

BBC uses Natress Bleach Bypass filter in Apple Color
– There is a built-in Bleach Bypass filter, but Natress’s one is better. They also use Natress’s film effects plugins.

Apple Color can match any high-end system at a fraction of the price – if you have the time.
– The problem is that clients/production people need to understand that Color will seem to be dropping frames. However tricked out the Mac is, it seems to play 90% of the frames per second. You need time because rendering usually takes 6 times real time.

Apple Compressor for standards conversion very slow, but good enough

More soon…

In which I take an Apple patent and suggest that it could form the basis of a new collaborative on-location application for the cloud, iPhone and iPod Touch for TV and film makers.

Storyboards are fine in principle, but crews need to use enough setups to cover enough angles to capture the drama so that directors and editors can later tell the story in ways that that they didn’t plan.

The recent patent granted to Apple is more about shoot planning than storyboarding. Instead of creating a comic-book simulation of a potential film, it helps movie makers plan how to cover the action in a scene.

scene-planning-patent

In a potential ProApps product, Apple imagine using the script to plan where characters will stand, how they’ll move and where the camera will be to film it, and possibly where the camera will be when getting different close-up, medium and wide shots.

Another aspect of this patent (according to the text at the World Intellectual Property Organization) implies that the output of this system wouldn’t be paper printouts to go with script sides. As at least two of the authors are from Apple’s iPhone team, maybe this system is about creating and maintaining a model for how production will proceed.
weshoot-iphone
A model that location managers, art directors, set dressers, continuity people, crew, caterers, actors and the post-production team will have continual access to using digital technology – on browsers and iPhones (which may be in Airline Mode some of the time).

This tool should have post-production uses too. It might replaced lined scripts. For an explanation of lined scripts (and how they are used with Avid’s ScriptSync feature), read Oliver Peters’ article on his blog.

Instead of lines showing number of setups and number of takes being written on the script, the editor will be able to look at the footage captured in the context of the scene in 3D-space. It’s interesting that Apple might now attempt to introduce new organisational techniques that supplant the methods used over the last 75 years.

As an aside, this is the first patent that reminds me of a book. If it comes to pass, this system will help you plan your film following the tenets of Daniel Arijon’s Grammar of the Film Language – a useful director’s text from 1976 (check out the positive reviews on Amazon).

In which I say why I can’t make NAB, but pass on a code ‘worth $150’ that their PR agency sent me.

Over the years I’ve watched the stories coming out of the NAB Show, and heard tales from those who visit. Sometimes I daydream about visiting – especially if I’m going to be in the US at the time. I’ll have to leave the reporting up to my friend Rick Young this time.

Given the nature of trade fairs these days, maybe NAB 2009 would be a good one to visit. If exhibiting and attending events like this starts to make less sense (ironically possibly because of some of the technology shown at NAB itself) in future, maybe you should catch one of these remnants of the 20th century in Las Vegas in April.

If I lived within four hours of Las Vegas, I would spend at least one day there.

Looks like I have enough pull with this blog for NAB’s PR company to send me a ‘a special registration code that you may pass along to your readers that will give them a FREE exhibits-only registration.’

So with that bit of full disclosure, if you want to save $150 (for access to the exhibition area and to the opening keynote), go to http://nabshow.com/passport and quote Free Exhibits Passport Code: TP01 (that’s T P zero one).

PS: If you want to follow NAB on social networks, you can – although http://twitter.com/nabshow is typical of business not yet understanding the nature of Twitter. They should be using social media as a precursor for replacing much of what the trade show is…

In which I show how to use the Final Cut ‘Dip to Color Dissolve’ transition effect to produce a camera flash between shots.

My friend Matt asked if I could create a flash frame transition plugin. Sometimes he likes to start a new shot with a flash of white that fades away very quickly as if a camera flash went off. He currently adds a six frame white colour matte on a higher channel and adds a dissolve transition:
Using a colour matte to create a flash frame

It turns out that you can modify the settings of a built-in transition to make a flash frame transition.

1. Add a standard ‘Dip to Color Dissolve’ transition:
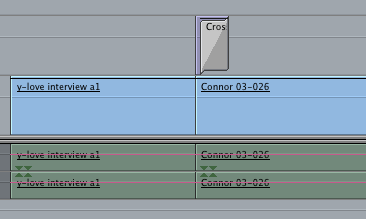
A 'Dip to Color Dissolve' transition applied between two clips

These are the standard settings:
The default settings for 'Dip to Color Dissolve'

2. Change the sliders and colour so the transition controls look like this:
'Dip to Color Dissolve' settings changed to make a flash frame

Threshold sets the point of the transition where the colour fills the screen. The default of 50 makes it appear at the midpoint of the transition. If set to 0, the transition will start with the colour you choose.

Soft defines the amount of time the colour fills the screen. The default of 100 makes the colour appear for a single frame – setting it to 0 will make the colour appear for the full duration of the transition. With a short transition duration, a value of 80 will make the white flash stay for two frames before fading away.

3. Change the duration and transition alignment as follows:
Modifying the duration and alignment of a transition

Your timeline should now look like this:
The modified 'Dip to Color Dissolve' transition on the timeline

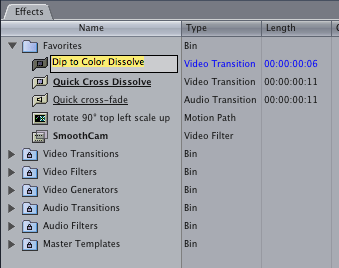
4. If you want to use this transition elsewhere in your project and in other projects, drag the modified transition from the timeline to the Favorites folder in the Effects tab of the project window. You can then rename it if you like:
Renaming a transition favourite

A renamed transition favourite

5. When you apply this transition, drag on top of the front of the clip you want to add the flash to:
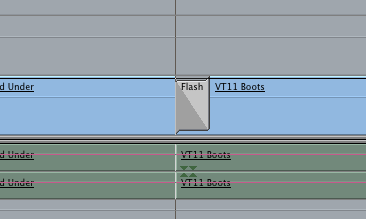
The 'Flash Frame' transition favourite applied to a clip on the timeline

This filter is much simpler than recent ones. It scales down the clip it is applied to and adds copies around the edge of the clip.
Alex4D Repeat filter

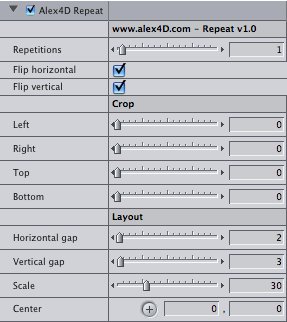
You have the option to flip the copies horizontally and or vertically, crop the clip and add space between copies:

Alex4D Repeat controls

Download Alex4D Repeat
To use this plugin, download the ZIP document, copy the ‘Alex4D Repeat.fcfcc’ file to

Your Startup HD/Library/Application Support/Final Cut Pro System Support/Plugins

(Your Startup HD/Users/your name/Library/Application Support/Final Cut Express Support/Plugins for Final Cut Express users)

‘Alex4D Repeat’ will appear in the ‘Tiling’ filter category.

Visit my Final Cut home for more plugins and tips
finalcuthomethumbnail

This is an improved version of Apple’s built in Cube Spin transition.
Cube Spin Alex4D transition sample frames

This video shows the improved options:

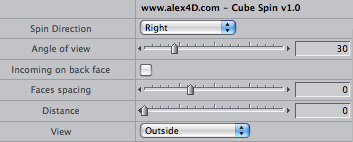
The first part of the controls provide extra options:
Cube Spin - Spin controls

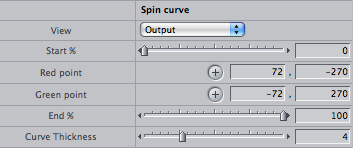
The second part gives you control of how the spin effect is applied. You can display a graph showing how the spin value ranges from 1 to 0 – with 1 at the start of the transition, 0 at the end. Bezier control points define the shape of the curve between 1 an 0:
Cube Spin - Curve controls

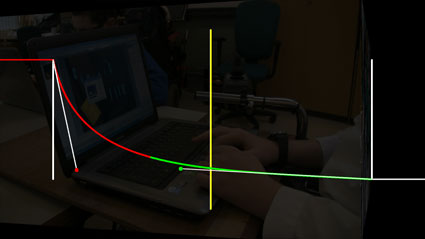
This graph shows how Final Cut’s built in ‘Cube Spin’ transitions from 1 to 0 – a uniform slope:
Uniform graph

The default graph for the ‘Cube Spin – Alex4D’ transition starts and finishes gradually:
Graph starting and finishing smoothly

The bezier control points can be modified so the transition starts slowly and finishes quickly:
A graph that starts slowly and finishes quickly

Or so that the cube spins quickly initially (the graph starts very steeply), then slows down as the transition finishes:
Fast start, slow finish graph

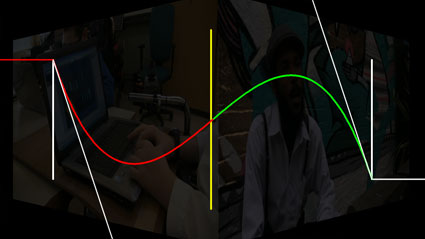
This is the graph of the transition shown in the video where the cube spins forwards, backwards and forwards again:
Spin forwards, backwards and forwards graph

You can also set different border thicknesses and colours for the outgoing and incoming clips:
The first part of the border controls

Download Cube Spin - Alex4D transition
To use this plugin, download the ZIP document, copy the ‘Cube Spin – Alex4D.fcfcc’ file to

Your Startup HD/Library/Application Support/Final Cut Pro System Support/Plugins

(Your Startup HD/Users/your name/Library/Application Support/Final Cut Express Support/Plugins for Final Cut Express users)

‘Cube Spin – Alex4D’ will appear in the ‘3D Simulation’ video transition category.

Visit my Final Cut home for more plugins and tips
finalcuthomethumbnail

This transition uses a wave to progressively distort the outgoing clip as a waved incoming clip appears.
Alex4D wave transition sample

Here are the controls. I’m also introducing better control of the blend applied between the clips:
Controls for the Alex4D Wave transition plugin

This clip shows a variety of effects using this transition:

Download Alex 4D Wave transition
To use this plugin, download the ZIP document, copy the ‘Alex4D Wave.fcfcc’ file to

Your Startup HD/Library/Application Support/Final Cut Pro System Support/Plugins

(Your Startup HD/Users/your name/Library/Application Support/Final Cut Express Support/Plugins for Final Cut Express users)

‘Alex4D Wave’ will appear in the ‘Dissolve’ video transition category.

Visit my Final Cut home for more plugins and tips
finalcuthomethumbnail

I’ll be posting my wave transition plugin later today, I’m also working on a user interface for editing the curves of values during transitions. This means that you’ll be able to edit the way a value changes during a transition.

This one shows how the transparency of the outgoing clip goes in a straight line from 100% to 0%. The transition will have the option to display a curve editing mode. I hope to add control points so that the line won’t be straight…

My future transition plugin will have a curve editing mode

Mr. Gaskin writes in to the blog:

…wouldn’t it be great if we were able to *rotate* the mask-shape filter. That way I could selectively isolate diagonals or keyframe the mask-shape on a changing shape in the shot.

Having a look at this idea points up the problem: you can’t use FXScript to modify the values used in the controls. I’ve come up with a plugin that gives this sort of control, but there’s a limit to the user interface: You can set your eight points up where you want them to be. If you want to rotate that matte, using keyframes for example, the new position of the points changed by the rotation cannot be put into the controls of the filter.

That means if you want to keyframe the rotation, scale and position of your matte to follow a specific feature in your clip and the shape of the feature changes, the points that you manipulate on screen won’t match the edge of your matte:
The matte cannot line up with the control points

In this case, the matte has been scaled and repositioned so that the edges don’t line up with the control points. The control points on screen define the shape of the matte, other controls describe the location, size and rotation of the matte. You can change the View Mode to ‘Wireframe’ to get better control of the shape by seeing how moving a point changes the line that defines the edge of the matte:
It is easier to edit in Wireframe View Mode

Here are the controls:
Controls for Alex4D 8-point Matte plugin

Download Alex4D 8-Point Matte
Download: Alex4D 8-Point Matte.

Copy the ‘Alex4D 8-Point Matte v1.fcfcc’ file into one of two places on your computer:

Your Startup HD/Library/Application Support/Final Cut Pro System Support/Plugins
or
Your Startup HD/Users/your name/Library/Preferences/Final Cut Pro User Data/Plugins/

(Your Startup HD/Users/your name/Library/Application Support/Final Cut Express Support/Plugins for Final Cut Express users)

Restart Final Cut, and you’ll see the filter in the ‘Matte’ section of ‘Video Filters’

Visit my Final Cut home for more plugins and tips
finalcuthomethumbnail

This is an example of what I’ve been talking about. A twitter thought leads to a blog post… or two.

When I woke, my guest was watching TV. Part of the show was an interview with a French person. His voice was dubbed. As I know a little and my friend knows all French, it was a pity that we couldn’t hear what they had to say while reading the subtitles if needed.

It seems that dubbing foreign speech has become much more common that subtitles in the last 10 years. This is true of even the most highbrow TV news programmes. In 1995 they would have subtitled non-English speech. Now they hardly ever do.

There are two explanations: that TV producers and news editors think audiences are put off by subtitles, or that subtitling technology hasn’t kept up with the world of simpler post production – compared with dubbing.

I’d like to assume the latter for the moment. What is it about subtitling that makes it more difficult to organise than dubbing. It is that it isn’t too difficult to get a simultaneous translator to translate and speak at the same time, whereas producing well-written and well timed subtitles is hard.

For live TV, there is an interesting solution. Subtitle describers are employed to repeat what people are saying and what sounds can be heard into a speech recognition package, which produces subtitles for those who turn them on using their remote controls. All non-satellite TV channels have subtitles on 97% of all shows, this is how they provide the service.

This points up that editing software should not treat subtitling as an effect that is laid on top of video at some point, or only implemented when making a DVD. Maybe it is time that script, music and sound effect information is associated directly with audio clips so that scratch subtitles track could automatically be generated. Then professional summarisers and designers would clean them up before the production is delivered online, on DVD or broadcast.

A thought leads to a blog post… or two

So the original thought was “With people speaking foreign languages, over the last twenty years the technology of subtitling has fallen behind dubbing. A pity.” – Which is what I posted to Twitter 11 hours ago, before going out and having a great day in London. I didn’t think about it until I got back a short time ago and saw that Matt Davis had written a blog post partially inspired by my tweet.

Matt Davis' Twitter profile picture
His idea is much bigger than mine – maybe leading to a whole new media for a Social Media platform to share and discuss. That’s why you should check it out (Also follow Matt on Twitter if you like or blog his feed).

I then decided to write a post about Twitter and blogs, which meant turning my initial thought into (almost) an idea.

This is how Twitter and blogs can work.