For a limited time my two commercial plugin packs are on sale. They are available at 20% off.
Alex4D Animation Transitions
This pack of 120 transitions can be used to animate whole video clips, images, titles and logos on and off the screen. No need to use keyframes. Choose a few settings and your animation is done. Need to change the timing? Simply change the duration of the transition by dragging in the Final Cut Pro X timeline. No need to change the values and times for keyframes of multiple parameters.
Alex4D Animation Transitions also works in any aspect ratio. As well as traditional 16:9, they can be used to make super-wide animations in a 48:9 aspect ratio or wider. They can also add animation to square and vertical videos used in social media:
This toolkit helps you tell stories with spherical video. Final Cut Pro X 10.4 introduced 360° features. Alex4D 360° Effects makes Final Cut even better.
This pack of effects includes three free plugins that speed up 360° video production.
On my main site I have added a new product for Final Cut Pro X editors: VR video effects.
This kit of simple to use effects range from effects that stylise whole spheres of video to those that help viewers notice specific features of the 360° environment. As well as working with spheres of video, they also work with overlays such as logos, pictures and titles.
Alex4D 360° Effects adds vital parts of the VR toolkit to FCPX’s native abilities. I cannot envisage completing a project without them anymore, a genuine “must have” addition for me.
Alex4D 360° Effects includes three free plugins that can instantly save time in spherical video production.
The pack is divided into six categories: Repeat – to repeat footage and overlays around the sphere, Highlight – to attract attention to specific parts of the environment, Blur – blur parts of your footage and overlays, Stylize – to change the look of whole spheres at a time, Masks – to help overlay areas of 360° content inside other spheres and Flat – to make more of 360° footage used in flat non-spherical videos.
A very few times a year, my plugins are available at 20% off the normal price. Today it means you can get my pack of 120 plugins for Final Cut Pro X for only $39. Please check them out very very soon.
To help people work out which Macs work best with Final Cut Pro X, it is useful to refer to a standard speed test.
All but one of the MacBook Pros with Retina configurations do not have dedicated GPUs. New Mac software is depending more and more on GPU power. Editors want to know if the integrated Intel Iris and Iris Pro Graphics GPUs are powerful enough to run professional software well.
Early testing shows that Iris Pro graphics are better than many expected. Take a look at a new post at Bare Feats:
In the past we sneered at the integrated GPUs and their puny performance. Not any more. The Intel Iris and Iris Pro are every bit the match or master of discrete NVIDIA Mobile GPUs — at least when it comes to OpenCL acceleration.
Although it is great news that integrated GPUs are getting better, many are worried that the MacBook Pros should be avoided until Iris Pro has improved a little more.
A speed test proposed by FCP.co was to time the render of Final Cut Pro X’s built-in ‘Far Far Away’ title on a 23.975 1080p timeline. This test puts enough pressure on main memory and GPU memory to separate older generation Macs from more recent computers.
Over at the the FCP.co forum, qbe asked me to do the ‘Far Far Away’ test on my new late 2013 MacBook Pro 15″ using only the built-in Iris Pro Graphics and also on only the Discrete GeForce GT 750M GPU which I included in my BTO Mac.
It turns out that the test wasn’t tough enough to show a difference between the two GPUs:
MacBook Pro late-2013 Discrete GeForce GT 750M 2GB 18.8 seconds MacBook Pro late-2013 Intel Iris Pro Graphics 1GB 19.2 seconds
I’ve come up with a test that shows the differences between these GPUs and other Macs…
The BruceX benchmark
BruceX is a small Final Cut Pro X XML file that you import into Final Cut Pro. It creates a very short timeline at a high resolution: 5120 by 2700 (at 23.975 fps). It uses standard Final Cut generators, titles and transitions. As it uses many layers of complex content, it requires lots of GPU RAM.
The Bruce X benchmark is based on timing how long a Mac configuration takes to export the project.
…and time the export of a 5K master file from the timeline.
Detailed instructions
1. Have both QuickTime Player and Final Cut Pro open at the same time.
2. In Final Cut Pro, go to ‘Final Cut Pro:Preferences…’ – in the Playback tab make sure ‘Background render’ is off.
3. Make sure no libraries are open. Open the BruceX.fcpbundle library which contains a very short but complex 5K project.
4. Click the new ‘BruceX Test – 5K ‘ project timeline (this makes the Share command selectable)
5. Export the QuickTime movie by choosing “File:Share:Master File…’
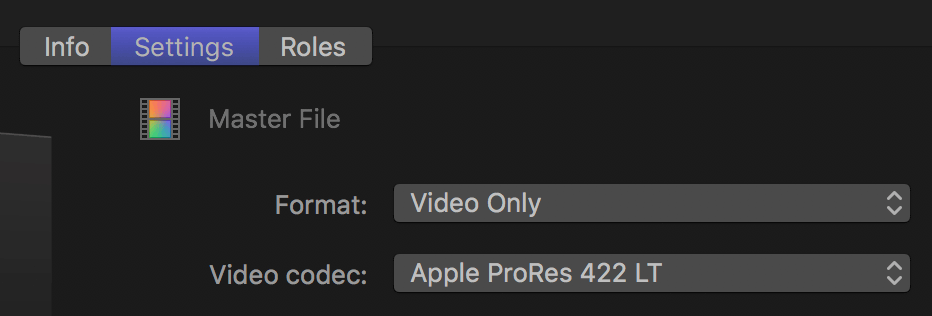
6. In the dialogue box that appears, click the ‘Settings’ Tab
7. In the ‘Video Codec’ section choose a flavour of ‘ProRes’
8. From the ‘When Done’ pop-up menu, choose ‘Open With QuickTime Player’
9. Click the ‘Next…’ button in the bottom-right of the dialogue box
10. In the Save sheet, choose a name and location for the export – export to your fastest drive connected using your fastest connection.
11. Get your stopwatch ready and time from when you click ‘Save’ until you see the movie open up in QuickTime Player.
12. If possible do the export at least three times. Your configuration’s BruceX Score is the average export time in seconds. Before timing the next export, restart Final Cut (otherwise the exports speed up each time because X does a little caching renders to save time).
The results show that BruceX tests processor power, but also shows that Iris Pro Graphics has some way to go to match a discrete graphics GPU in the new MacBook Pro 15″ with Retina
MacBook Pro late-2013 2.6 Ghz Quad Core i7 16GB 1600 MHz 1 TB SSD Discrete GeForce GT 750M 2GB GPU OS X 10.9.0 88 seconds
MacBook Pro late-2013 2.6 Ghz Quad Core i7 16GB 1600 MHz 1 TB SSD Iris Pro Graphics 1GB GPU OS X 10.9.0 163 seconds
( To choose which GPU to use for the test on my MacBook Pro, I used gfxCardStatus by Cody Krieger – a Shareware app downloaded from gfx.io )
Although many Final Cut Pro X users were disappointed that Apple didn’t announce a new version on October 22, the day’s launches provided some interesting news.
The first of which is that most of the effects, titles, generators and transitions in iMovie 2013 were created using Motion 5, the animation software used to make plugins for Final Cut Pro X.
It is possible to open the titles, effects, generators and transitions built into iMovie using Motion 5.
If you search the internet for statements from Adobe justifying these price differences, you get this sort of thing (from an Adobe.com forum):
Local market conditions significantly influence our pricing – these include the costs of doing business in different regions and customer research that assesses the value of the product in the local market…
…the cost of doing business in the rest of the world is higher than in North America. That higher cost is reflected in some of our pricing and would remain no matter how customers chose to purchase. For example, customers will still read about our products through local press to whom we reach out; they will meet local Adobe sales people who conduct seminars, participate in user groups, and visit large customers; and they will rely on support resources that Adobe makes available in these markets. All of these efforts impact the business costs of securing the sale, whether that sale is delivered online or in a box.
Adobe pricing advice
I’ve made over 50 free plug-ins for Final Cut Pro X. If I produce commercial plugins, I’ll need to decide how much to charge for them. Given that Adobe have much a higher market research budget than I do, perhaps I should use that research to calculate any international price differentials. They believe that the UK market will bear a 15-20% increase over the US, who am I to contradict them?
Final Cut Pro 7 comes with an html-based help system. Many people like to have a single document as a manual. Such a thing is not yet available for Final Cut Pro 7. As Apple own the copyright in the manual, those that have created a single document version cannot legally distribute it. However, if you own Final Cut Pro 7, you can use these instructions to make your own manual:
You will first make all the content visible using TextWrangler from Bare Bones Software, and then combine the whole help system into a single document using Pages, Apple’s word processing application – which is part of iWork.
The trial version of Pages was probably installed with OS X on your machine. However after trying it for 30 days (after you first start iWorks), the trial version cannot save or print documents, so if your trial period is up, additional instructions follow.
The only parts of the manual that don’t transfer well are a few tables. The links no longer work, but you can copy the linked text and find it pretty quickly.
Make all content visible
When you first go to a section with disclosure arrows, they default to being closed:
This means you have to click each blue arrow, or the words next to each arrow, to see what is hidden:
To have a version of your documentation that defaults to all the information being visible, you need to change the source HTML of the files. You need to rename all instances of “TaskContentBox” to “TaskContentBox-open” in all the .html files in the help system.
— Create a copy of the documentation built into FCP7: Control-click the Final Cut Pro application, choose ‘Show Package Contents’ from the shortcut menu
— In the new window that shows the content of FCP, navigate to “Contents:Resources:English.lproj”
— Create a copy of the “finalcutpro_help” folder by dragging it elsewhere on your Mac, outside the Final Cut Pro window
— Start “TextWrangler” and choose “Find…” from the “Search” menu
— Switch back to the Finder while Text Wrangler is still open and navigate to where you created the copy of the FCP help system, navigate inside to “en/finalcutpro” and drag the “usermanual” icon to the “Multi-File Search” area of the TextWrangler Find dialogue box.
— Search for “TaskContentBox” (including the quote marks)
— Replace With “TaskContentBox-open” (again including the quote marks)
— Click “Replace All”
— Make sure the confirmation dialogue looks like this:
i.e. Don’t Confirm Saves
— After a short while 698 of your help files will have been modified.
— Quit out of TextWrangler
— Go to the top level of the “finalcutpro_help” folder and drag the “index.html” icon to your browser application.
You now have a help system will default to all the information being visible, and it displays more quickly in a browser than Apple Help Viewer.
Combine into a single document
— Start Pages with a ‘File:New’ blank word processing document.
— Go to the ‘Insert’ menu and use the ‘Choose…’ command
— Navigate to where you put your copy of the ‘finalcutpro_help’ manual
— Navigate to “finalcutpro_help:en:finalcutpro:usermanual” to see a list of all the html files in the documentation system
— Make sure it is sorted by name
— Click ‘chapter_preface_section_0.html’
— Shift-click ‘chapter_preface_section_3.html’ to select the four preface files.
— Click the ‘Insert’ button
— Again ‘Insert:Choose…’
— Select from ‘chapter_1_section_0.html’ to ‘chapter_glossary_section_0.html’
If you have a trial version of Pages (a free download from Apple) but you have used it for more than 30 days, you won’t be able to save or print. However, you can copy text and pictures from documents in Pages and paste them into TextEdit documents.
My trial version of Pages ’08 couldn’t deal with copying 50MB to the system clipboard and crashed, so I’ve modified the instructions by copying from Pages into a single TextEdit document in three stages:
— Insert ‘chapter_1_section_0.html’ to ‘chapter_glossary_section_0.html’ followed by ‘chapter_1_section_0.html’ to chapter_40_section_15.html’ only.
— Switch to the ‘Final Cut Pro 7 manual’ document in TextEdit.
— ‘Edit:Paste’ ‘File:Save’
This document should act as a stop-gap until Apple add an official one to the help system. If you want to feedback to Apple that you’d like the documentation system changed, visit this page on the Apple site.
If you’d like to make similar single-document manuals for other applications in Final Cut Studio, their locations are listed in this post.