Archive

final cut pro

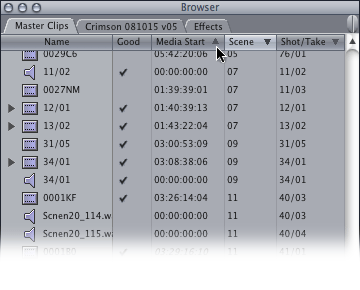
Here’s the browser for a project I’m working on:

You can see that I dutifully entered scene and setup/take information for each clip. The problem is that I want to sort by ‘Scene’ first, then by ‘Shot/Take.’ I found that if I click the ‘Scene’ column, the clips are sorted by scene, but use the name of the clip as the secondary sort factor. I spent time modifying the P2-supplied names of the clips to match their setup and take number.

As I didn’t finish renaming all the clips, you’ll see the sort is in the wrong order. In scene 7, the clip for take 3 of setup 11 appears before take 2; in scene 11, setup 41 appears before setup 40. As you might be able to see, I had multiple takes from over 75 setups to rename, so I turned to the manual for help.

It turns out that you can sort by any number of columns you want. For example, to sort by Scene first, then by Shot/Take secondly, click the ‘Scene’ column heading, then shift-click the ‘Shot/Take’ heading:


These clips are sorted by scene and shot/take.

If you want to add a third sort, shift-click a third column:

As my sound clips have the same scene and shot/take number, I can sort by timecode. As the audio was recorded on a hard disc recorder, the media starts at 0, so the audio clips appear first when the other two values (‘Scene’ and ‘Shot/Take’) are the same.

If you want to reverse the sort on a column, click the arrow:

If you want to reset the sort so that it only applies to one column, click its heading without using shift.

That’s the problem with using FCP for years. You hardly ever check the manual to see if your workarounds (naming the clips in this case) still apply.

Visit my Final Cut home for more plugins and tips
finalcuthomethumbnail

All those years ago, all we did is upload links to other places. Alta Vista wasn’t around, and no-one could think of anything else to add…

Tips

Larry Jordan’s tip of the day
FCP Tips – a site with video tips and tutorials for Final Cut
Digital Heaven tips

Plugins

Piero’s Final Cut Express plugins – free plugins – and information that helped me create my own
Andy’s plugins – all free
Digital Heaven plugins – for Final Cut

Writing plugins

Apple documentation – for those who already know simple scripting
fxScript reference – an online plugin scripting community

News

MacVideo – all about creating video on Macs
HDFilmtools – a different Larry Jordan’s video interview site

One of the default settings of Apple’s Finder is different from what I’d like. I hardly ever want QuickTime movies to open in any application other than QuickTime Player. Any QuickTime movies created in Final Cut will open in Final Cut.

It used to be that I would export a QuickTime movie from Final Cut, quit and then double-click the exported movie in the Finder, wanting to check the movie before I uploaded or recompressed it. Moments after I had quit, Final Cut would open again. Final Cut would also open any movie it created at any time after… I was always surprised when Final Cut opened.

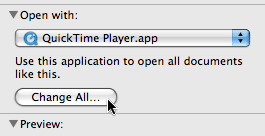
There is a way around this. To make sure any QuickTimes created in Final Cut don’t automatically launch Final Cut when double-clicked, go to the Finder and choose one of the files and select ‘Get Info’ from the File menu (or press Command-I):

First choose ‘QuckTime Player’ from the ‘Open with:’ menu. This will make this specific movie open in QuickTime Player. Then click ‘Change All…’ to make all Final Cut generated movies always open in QuickTime Player:

Here is my free plugin to help create closing credits scrolls using Final Cut Pro 6 & 7.

You can use up to four type styles. Two for centred text, one for text that’s aligned to the right – which usually defines roles in productions – and a style for text that’s aligned to the left – which names the actor or person involved.

This image…

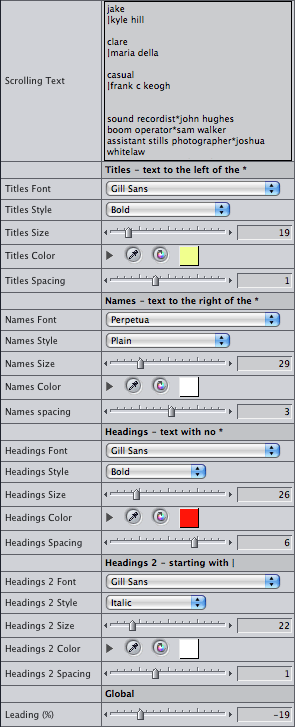
is the result of using these settings:
This is a recording showing font colour and sizes of type being changed in real time:

For each style you can instantly change font, size and colour while clients watch. You can also control scrolling speed in pixels per second as well as keyframable speed changes.

The default settings…

…produce this image:

Like Apple’s ‘Scrolling Text’ generator, the ‘*’ character denotes the difference between roles and the names of the people performing the roles.

There are also two heading styles. You can use these two headings styles to do TV-style end credits too. You denote main headings by not including a ‘*’ character, secondary headings are marked with a ‘|’ character at the start (use ‘Shift-\’ to get the ‘|’ character).

Each of these styles have font, typesize, colour and spacing settings.

All the lines have the same line height. This is based on the ‘Names Size’ parameter. You can use the ‘Leading’ parameter in the ‘Global’ section to add or take away space between lines.

Animation methods

There are three ways of animating the credits: ‘From In to Out’ (the speed is set to show the all credits using whatever duration you give the generator), ‘Keyframe % Complete’ and ‘Speed (pixels/sec)’ – the second two options make it easier to synchronise more than one instance of the generator.

If you choose ‘Keyframe % Complete’ as the animation method, set the ‘% Complete’ parameter to 0 at the first frame of the generator, set a keyframe, move to the point you wish the credits to clear the screen and set the ‘% Complete’ parameter to 100%:

You can also set the speed of the animation to a specific speed. This parameter doesn’t keyframe well, so choose a fixed speed and the text will move at that speed. Choosing specific speeds is useful if you have small type that will be shown on interlaced video. Adam Wilt has written the definitive page on scrolling speeds for DV productions. His bottom line is:

Unfortunately, in 525/59.94 [NTSC] the only two decent rates that are slow enough to be read are 120 and 240 (and the latter only on a good day!). 625/50 [PAL] video is better — not only are the roll rates about 20% slower, there are almost 20% more active scanlines in a frame, so in 625 you can roll at 100, 200, and 300 lines/second without straining any eyeballs.

The values Adam uses for lines per second I call pixels per second in this plugin.

If you want to animate other generators, stills and clips using these three methods (for example to add a logo to your credit scroll), use my ‘Move’ plugin.

Download Alex4D_closing_credits_v1

Installing the plug-ins

Download the ZIP archive of the plugins. Drag the plugins from the ‘Alex4D_closing_credits_v1’ folder to one of two places on your computer:

Your Startup HD/Library/Application Support/Final Cut Pro System Support/Plugins

or

Your Startup HD/Users/your name/Library/Preferences/Final Cut Pro User Data/Plugins/

Restart Final Cut, and you’ll see two new generators in the ‘Text’ section of ‘Video Generators’

To set up a credit list,
1. Either
– Open the Effects Tab in the browser, open the Video Generators folder, open the Text subfolder, double click one of the ‘Closing Credits’ generators
– In the viewer window, click the Generators popup…

… and choose ‘Alex4D Closing Credits’ from the menu

2. The generator will open in the Controls tab of the Viewer. Enter some initial text in the ‘Scrolling Text’ field.
3. Click the Video tab of the Viewer and drag the video onto your timeline to add the new instance of the generator to your timeline.
4. To make changes to the generator you have just added the timeline, double-click it to load that instance into the viewer, click the Controls tab and make changes. You’ll see them update in the canvas (if the playhead is over the generator).

Because Final Cut doesn’t always list all the fonts on your machine in font popup menus, I’ve also included a version of the plugin without font popup menus but with places for you to enter the names of the fonts you want to use.

Visit my Final Cut home for more plugins and tips
finalcuthomethumbnail

Due to the litigious nature of the world, I need to add the following weasel words: These plugins are provided ‘as-is’ and come with no warranty whatsoever. Under no circumstances is the author liable for any data loss or corruption. Use them at your own risk. Save copies of your critical projects when using these plugins. I’ve tested them on Final Cut Pro 6.0.4, but they should work on any version of Final Cut Pro or Express released in the last five years back to FCP4.

Having used Macromind Videoworks and Macromind Director Interactive, I’ve used markers in timelines for many years. I’ve missed having named markers in Final Cut – seeing the names of each marker in the timeline. I’d also like a way of moving more than one marker at a time.

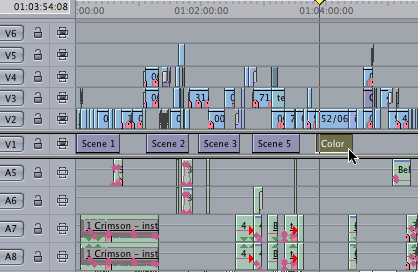
Until the next version of Final Cut, you have the option to use named generators. Here some ‘Color’ generators are placed at the start of each scene:

If you don’t want to put them on layer 1, you can have the generators at a higher layer and set the opacity to 0%.

You can give generators names using the ‘Item Properties’ sub-menu from the Edit Menu, or press Command-9 or Right/Control-click the clip. You can give the clip whatever name you find useful for your edit:

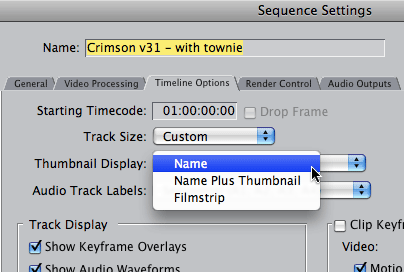
You’ll have more room for the name of each clip to be shown if you choose ‘Name’ from the Thumbnail display popup in the Timeline Options tab of the Settings… command (Sequence menu or command-0):

In the next few days I’ll upload a free plugin for you to download that will let you create closing credits scrolls in a Final Cut Pro generator. Before I finish it, have you got any ideas for features? Here is a preview of the Canvas screen while I change settings in the control tab of the generator:

Leave any suggestions in the comments of this post.

Every once in a while I like to check something in one of the Final Cut Studio manuals. They are stored as PDFs inside the applications themselves. It is possible to get inside the application using the Finder, but there is a simpler way.

I also like to look at more than one page of a manual at a time. That can be done with a spare digital copy of the manuals.

To get your spare copy, choose the manual from the Help menu:

The manual will open in Preview. Go to Preview’s file menu and save a copy of the manual wherever you’d like to keep it:

Manual highlights

Some information useful for Final Cut Pro users can be found in other manuals.

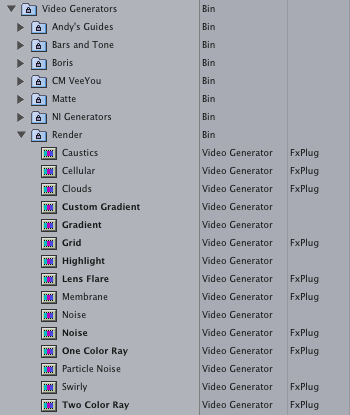
If you’d like more information on the generators installed when you install Motion, you can find more in the Motion manual. You can tell which generators are installed with Motion by looking at the Render generators. Those that use FxPlug technology came with Motion:

Information on their controls can be found on pages 968 to 983 in the Motion User Manual:

Even though you might not want to completely explore all the features of Soundtrack Pro, it might be worth your time reading parts of Soundtrack Pro’s ‘Effects Reference’ manual:

A compressor works like an automatic volume control, lowering the volume whenever it rises above a certain level, called the threshold. Why would you want to reduce the dynamic level? By cutting the highest parts of the signal (called peaks), the compressor lets you raise the overall level of the signal, thereby increasing the perceived volume. This gives the sound more focus by making the louder foreground parts stand out while keeping the softer background parts from becoming inaudible. Compression also tends to make sounds tighter or punchier because transients are emphasized (depending on attack and release settings) and because the maximum volume is reached more swiftly.

In addition, compression can help make a project sound better when played back in different audio environments. For example, the speakers on a television set or in a car sound system typically have a narrower dynamic range than the sound system in a theater. Compressing the overall mix can help make the sound fuller and clearer in lower-fidelity playback situations.

By default, the manuals open in Apple’s Preview application, but the search features of Preview could be better. If you have Adobe Acrobat Reader installed, you have better search. In Preview if you search for ‘Stop Analysis’ for example, you’ll be directed to every page with ‘Stop’ or ‘Analysis’ or ‘Stop’ and ‘Analysis’ anywhere on the page. If you use Acrobat Reader, it defaults to looking for pages with the specific phrase ‘Stop Analysis’ – much more useful (Pity the rest of Acrobat Reader is so bloated!).

For those of you who have been using Final Cut Pro for a while, there is a bug that has been hanging around for very many years. It usually crops up when a client brings you a font they want to use. You install it onto your Mac, but the font doesn’t work properly in the Final Cut generators and filters.

For example, your client might want to use various members of the ITC Century font family:

The various weights of ITC Centrury

Once you install the font, there are two problems:

1. Final Cut Pro doesn’t give you the option to use all the weights available
2. It displays an incorrect weight (boldness) of the font when you choose the ‘Plain’ style.

In some cases, the font install doesn’t appear in Final Cut Pro’s font menus at all.

This bug is due to the internal names of fonts. Final Cut assumes all fonts come in four variations: plain, italic, bold and bold italic. It also assumes that the ‘Plain’ variation doesn’t have a name ending in ‘Book’ or ’55.’ I have 19 variations of Univers installed on my computer. I can only choose one of these within Final Cut Pro.

It turns out that the problem is in the part of the Application that builds the ‘Currently available fonts’ pop-up menu that appears in text generators and a filter (‘Viewfinder’ in the Video category). Final Cut can display any font installed on your computer, but there isn’t a way of telling it which font you want to use: ‘ITC Century Light’ doesn’t appear in the pop-up menu.

Luckily text generators and the filter are written in Final Cut’s effects scripting language, fxScript. That gives us a workaround: I’ve modified the plugins that use different fonts to provide the option to type in the name of the font you want to use. It is less convenient to have to type it in, but much more convenient when it comes to using your whole font library in Final Cut.

Download alex4d_FCP_fonts_plugins
Installing the plug-ins

Download the ZIP archive of the plugins. Drag the plugins from the ‘alex4d_FCP_fonts_plugins’ folder to one of two places on your computer:

Your Startup HD/Library/Application Support/Final Cut Pro System Support/Plugins

or

Your Startup HD/Users/your name/Library/Preferences/Final Cut Pro User Data/Plugins/

Restart Final Cut, and you’ll see a new set of generators and a video filter.

Due to the litigious nature of the world, I need to add the following weasel words: These plugins are provided ‘as-is’ and come with no warranty whatsoever. Under no circumstances is the author liable for any data loss or corruption. Use them at your own risk. Save copies of your critical projects when using these plugins. I’ve tested them on Final Cut Pro 6.0.4, but they should work on any version of Final Cut Pro or Express released in the last five years back to FCP4.

Using the plugins

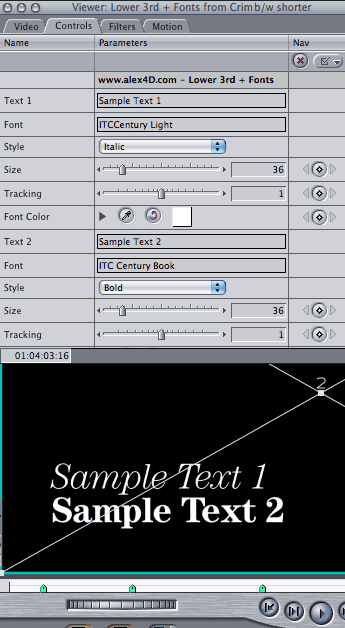
They use the same names as the generators and filter you already know, but with ‘+ fonts’ on the end. They work the same way as before except where there were popup menus for choosing the font, there is a text box for you to enter the name of the font you want to use:

Getting the correct name for the font you want to use

If you want the correct name of the font you want to use, you can copy it from the name shown in the formatting palette in Word:

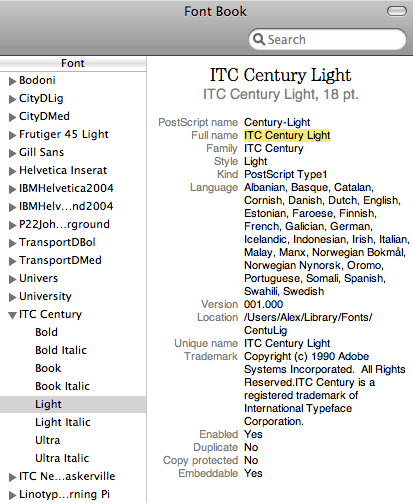
If you don’t have Word, you can use Apple’s Font Book application to get the correct name:
1. Select the font and weight you want to use
2. Choose Show Font Info from the Preview menu
3. Select the black text next to ‘Full name’

4. Use Command-C or choose Copy from the Edit menu to copy the full name of the font

As you can see from the Final Cut Pro screenshot above, both ‘ITCCentury Light’ and ‘ITC Century Light’ are equally valid when entering a name into the font field. However ‘ITCCentury Light Italic’ doesn’t work whereas ‘ITC Century Light Italic’ does.

I’ve tested this with the whole Univers family (eg “Univers 39 Thin Ultra Condensed” and “Univers 85 Extra Black Oblique”), the Helvetica Neue family, and many others – including a font with a very long name: “ITC New Baskerville Bold Small Caps & Old Style Figures”:

Future possibilities

Ideally it would be great if Final Cut’s font menus were more comprehensive, but the menus available to fxScript plugins aren’t. If you visit Andy’s plugin site, you’ll be able to download an improved version of the ‘Text’ generator – he made this fxPlug generator using XCode and a more advanced programming language than fxScript.

I might be able to compile a simple fxPlug filter that does nothing to the video output but simply displays a pop-up of installed fonts and puts the chosen font into a text field that can be copied from within Final Cut… but don’t hold your breath!

My Final Cut home for more plugins and tips

finalcuthomethumbnail

They say a picture is worth a thousand words. In this case a multi-megabyte video is worth a couple of hundred words:

You can use the motion bar and the filter bar in Clip Keyframes to move all the keyframes in a clip at the same time. You can also move all the audio level keyframes in a clip at the same time using the slip tool on the graph in the viewer.

That doesn’t quite make sense, so take a look at the video in HD mode, which means following the link to the HD video on the Vimeo site. Click the Vimeo logo in the controller bar to go to the page on the site with the HD version. Click the four-arrow icon on the right of the controller bar to scale the video up to 720p.

As a shortcut, you can choose which elements appear in Clip Keyframes mode by control- (or right-) clicking the Toggle Clip Keyframes button in the bottom-left of the Timeline window.

Visit my Final Cut home for more plugins and tips
finalcuthomethumbnail