Archive

FCP X plugin

Final Cut Pro version 10.0.1 includes an updated version of the Ticker title effect. I’ve come up with some additional improvements. The most useful one is that I’ve linked the size of the background of the ticker to the font size of the text (note that the font size control in the Text tab of the inspector is disabled – use the text size control in the Title tab instead).

Read More

Some editors who have animation experience miss the ability to smoothly control the position, scale and rotation of clips in Final Cut Pro X.

In the natural world objects don’t move at a constant speed, they slowly get moving, speed up and then slow down before stopping. That slow speed up and slow down is called ‘easing in’ to the animation and ‘easing out.’

My Smooth Move effect animates a clip between two states with the option to choose the shape of the curve that is used to animate the parameters.

Read More

This flexible transition can be used to momentarily produce a variety of effects by fading the outgoing clip while showing a background, and fading the incoming clip.

You can control the timing for the point at which the outgoing clip has faded out, the timing for the incoming clip, whether the background is a solid colour, a third clip of your choice or simply the storyline below.

The default settings produce the same effect as Final Cut Pro’s Dip to Color Dissolve:

Read More

A few posts ago I described a keyboard sequence that prevented an edit automatically having audio crossfade applied. Some editors require the reverse – a quick way of applying an audio crossfade without applying any video transition.

You can choose when the video appears over the duration of the transition:

Sound first: the audio will fade in first, and when it is at the full volume set by the clip, the video appears.

Centred: the audio will fade in, and when it is half way to full volume, the video will appear

Video first: the video will appear first, then the audio will fade in.

If you apply the transition to the first clip in a connected storyline, the clip below the storyline will remain visible while the audio fades in if the setting of the Audio transition parameter is set to Centred or Sound first:

prelap-audio-on-conncted-clip

Download the 20K ZIP archive from here.

…and add it to a Motion Templates folder in the Movies folder of your home directory:

If you don’t have Motion installed , you won’t have a Motion Templates folder in your Movies folder. Download this set of empty folders and add them to the Movies folder of your home directory.

Although the folder is called Motion Templates, you don’t need to have Motion installed on your computer for this effect to work.

If you find this free plugin useful, you might like my Alex4D Animation Transitions plugin pack:

Find out more about Alex4D Animation Transitions.

There are many more free plugins on my Final Cut Pro X page

16-free-effects

This effect is for making a clip appear as four copies at the same time, or showing it alongside three other clips at the same time in a ‘4 up’ arrangement:

Here are the default controls:

If you click the image wells and select three more clips (from the timeline, or an from an event), the controls will look like this:

Download the effect archive from here.

Expand the ZIP archive and add the folder to the Motion Templates folder in the Movies folder of your home directory:

If you don’t have Motion installed, you won’t have a Motion Templates folder in your Movies folder. Download this set of empty folders and add them to the Movies folder of your home directory.

Although the folder is called Motion Templates, you don’t need to have Motion installed on your computer for this effect to work.

If you don’t want to use the clips from the beginning, edit them from the events library onto your timeline using an in-point of your choice. When selecting the clip to use in one of the three image wells, click the clip in the timeline:

The clip used in the image well was from three instances on the timeline with different in points:

There is the option to turn off the 4 up effect and select a shot to display. You can also choose to highlight one of the four shots in the 4 up display.

If you find this free plugin useful, you might like my Alex4D Animation Transitions plugin pack:

Find out more about Alex4D Animation Transitions.

There are many more free plugins on my Final Cut Pro X page

16-free-effects

Alex4D Dimensions is a Title Generator effect that mattes the edges of a project so the visible area has exactly the pixel dimensions you specify. It helps you make videos with frame dimensions that aren’t available as standard in Final Cut Pro X.


In this example, someone here in the UK needs to use some 1280 by 720 footage in a PAL 16:9 video – the square pixel dimensions of which are usually defined as 1024 by 576, dimensions that aren’t available in Final Cut Pro 10.0.

1. Choose the generator that matches the resolution of your current project.

2. Drag it above clip at the start of the project.

3. Set the width and height in pixels.

4. Extend the title to the length of your project.

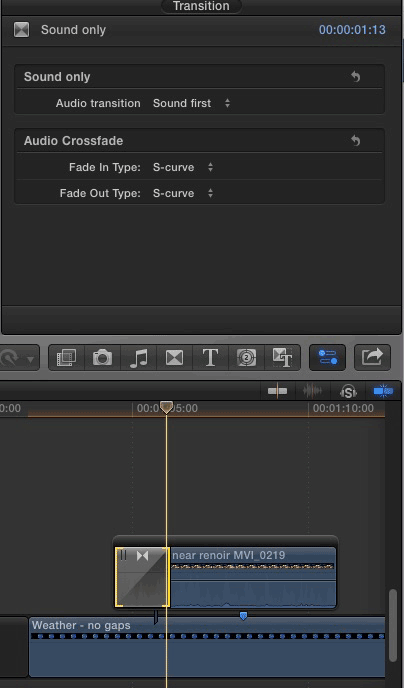
5. If some secondary elements end up being above the Dimensions clip in the timeline, drag the clip above the rest (holding down Shift if you don’t want the clip moving backwards or forwards in time).

Once the Dimensions clip is in position, you can edit away as normal – repositioning and scaling any video and graphics clips, choosing which parts will be visible in the final movie.

You can scale, move and manipulate your content in any way you want. If you wish to see what you will be cropping off your final video, you can reduce the strength of the matte.

As this title has to be connected to a specific clip, it will vanish if you delete that clip. If you need to delete the first clip, you can choose to connect it to a different clip, or even a gap clip. With the title selected, Option-Command-click the title at the new position you want your connector to be:

Here’s a demo video:


Click the Vimeo logo to go to their site to see an HD version.

Download the effect archive from here.

The 2K effect is for 2048 by 1024 projects, the 4K effect is for 4096 by 2048 projects. Comment below if you’d like versions for 2048 by 1556 or 4096 by 3112 projects.

Expand the ZIP archive and add the four folders to the Motion Templates folder in the Movies folder of your home directory. Create an Alex4D folder in the Titles sub-folder:

If you don’t have Motion installed, you won’t have a Motion Templates folder in your Movies folder. Download this set of empty folders and add them to the Movies folder of your home directory.

Although the folder is called Motion Templates, you don’t need to have Motion installed on your computer for this effect to work.

To end up with a video at the dimensions you’ve chosen, use the Share menu to export a QuickTime movie and use Compressor, MPEG Streamclip or Adobe Photoshop CS4 to crop your video.

Here are the settings to crop the 1280 by 720 movie generated in the demo video to 1024 by 576. The crop values are calculated by halving the difference between the source and destination movies. 1280-1024=256, so crop left and right by 128. 720-576=144 so crop top and bottom by 72.

Compressor

Compressor is available from the Mac App Store.

MPEG Streamclip

Click to enlarge.
MPEG Streamclip is a free download from Squared5.

Alternatively, you can use QuickTime Player 7 by following this tutorial.

Check out my other free effects and articles on my Final Cut Pro X home page.

Visit my Final Cut Pro 7 page for over 20 free plugins and more
finalcuthomethumbnail

Here’s my next Final Cut Pro X effect: a title generator of a resizable text box with various fill options.

A frame from a Final Cut Pro project showing the application of an instance of the Alex4D Text Box title generator

The same title generator can produce this result as well:
A frame showing that the area behind the text can also be blurred

Here are the controls:
A screenshot of the default settings for the Alex4D Text Box title generator

Although you can keyframe all the parameters in Final Cut Pro X, the co-ordinates will not animate correctly, this is due to bugs/design decisions in the current versions of Final Cut and Motion.

Download the effect archive from here.

Expand the ZIP archive and add the folder to the Motion Templates folder in the Movies folder of your home directory. Create an Alex4D folder in the Titles sub-folder:

If you don’t have Motion installed, you won’t have a Motion Templates folder in your Movies folder. Download this set of empty folders and add them to the Movies folder of your home directory.

Although the folder is called Motion Templates, you don’t need to have Motion installed on your computer for this effect to work.

10.0.3 update and fading the box in and out

I’ve updated the effect to work with version 10.0.3, an update that changed the way title generators worked. I’ve added a new Opacity parameter which you can keyframe (or fade in and out using the video animation graph). For more information on what’s changed, visit my blog post on the subject.

If you haven’t updated to 10.0.3, this effect will show a blue screen and/or cause Final Cut Pro X 10.0, 10.0.1 and 10.0.2 to crash. The 10.0.3 update works fine and is available for free from the Mac App Store. If you don’t want to upgrade download the old version.

Bugs

As the Final Cut Pro X and Motion 5 combination is relatively new, there are still a few bugs you will need to work around.

When you resize the text box so the right-hand edge changes Final Cut doesn’t get sent the message. That means it doesn’t redraw the text to reflect the new boundaries.

In this example, a wide text box has been made narrower:
Frame showing that Final Cut sometimes get the message about the change in size of a text box

The solution is to get Final Cut to redraw the text. The quickest way is to toggle the horizontal alignment. It will also be redrawn if you make any text or text format changes:
Frame showing what the text will look like once you get FCP to redraw it

If you find this free plugin useful, you might like my Alex4D Animation Transitions plugin pack:

Find out more about Alex4D Animation Transitions.

There are many more free plugins on my Final Cut Pro X page

16-free-effects

Those editors who are used to aligning transitions that start or finish on edits in Final Cut Pro Classic miss having the same feature in Final Cut Pro X.

Here’s a workaround – a couple of transitions that start a cross dissolve at the start or finish of an edit.

In Final Cut Pro Classic, transitions can be set to align at the start, centre or finish of an edit:
Screen capture of transitions in Final Cut Pro 7

This sort of alignment can’t explicitly be set in Final Cut Pro X. So, as a workaround until this feature is added, I’ve made two more cross dissolve transitions that can be used to get the same effect:

As the opacity of the incoming clip changes for only half the length of the transition, you have to make the duration of these two transitions twice that of the standard cross dissolve transition to keep the duration of the effect the same:
Screen capture of transitions in Final Cut Pro X

Download the transitions archive from here.

Expand the ZIP archive and add the folder to the Motion Templates folder in the Movies folder of your home directory:

If you don’t have Motion installed, you won’t have a Motion Templates folder in your Movies folder. Download this set of empty folders and add them to the Movies folder of your home directory.

Although the folder is called Motion Templates, you don’t need to have Motion installed on your computer for this effect to work.

If you find these free plugine useful, you might like my Alex4D Animation Transitions plugin pack:

Find out more about Alex4D Animation Transitions.

There are many more free plugins on my Final Cut Pro X page

16-free-effects

Here’s my first Final Cut Pro X effect: an improved version of the built-in Mask effect.

I’ve added four more points, access to numerical values for the 8 points:

In Final Cut Pro X, you aren’t limited to the minimums and maximums defined by the sliders. The maximum value for Roundness controlled by the slider is 50, but you can enter larger values in the numeric field:

I’ve also added the option to control the density of the mask inside and outside of the shape:

March 2012 update: I’ve created a more advanced set of Mask effects for Final Cut Pro X, with options to have more points on the mask and keyframable transform and distort controls.

Download the effect archive from here.

Expand the ZIP archive and add the folder to the Motion Templates folder in the Movies folder of your home directory:

If you don’t have Motion installed, you won’t have a Motion Templates folder in your Movies folder. Download this set of empty folders and add them to the Movies folder of your home directory.

Although the folder is called Motion Templates, you don’t need to have Motion installed on your computer for this effect to work.

To use the effect, apply it to a connected clip to a the main storyline:

Note that although you can keyframe the parameters in Final Cut Pro X, the co-ordinates will not animate correctly. I’ve asked Apple about this and they know about the bug in Motion 5/FCP X.

If you find this free plugin useful, you might like my Alex4D Animation Transitions plugin pack:

Find out more about Alex4D Animation Transitions.

There are many more free plugins on my Final Cut Pro X page

16-free-effects