This is an introduction for Final Cut Pro users to the wonderful world of Avid. This document is based around the features of Avid Media Composer, but should apply to most of the rest of the family.
Getting started
Avids require hardware USB keys – known as dongles. The software will not start without the USB key. If you take the USB key out while the software is running, it will warn you and then quit.
When you start the software, the Select Project dialog box opens. You can choose from the list or browse by clicking the folder icon to find others.
This is where you can choose which user profile to use. Almost everything is customisable in Avid. These user preferences are all kept in a user profile file. These mean each user of the same system have the preferences they want. You can transfer your profile to other systems using USB memory.
Unlike Final Cut, you can only have one project open at a time – but you can share clips (more of which later). Only one sequence can be open at a time.
Introduction to the tools
Window-specific contextual menus are called ‘Fast Menus’ in Avid.
Avid projects are not stored in single files that are backed up as a whole. Projects are collections of documents in a folder. Avid recognises a folder on your hard drive as a project when it contains bin documents and a project file.
Avid works as a bin editor. Clips, subclips and sequences are all kept in bins – you can’t have any of these things in the top level of your project.
Projects are backed up bin by bin. If a bin doesn’t change, there’s no point in backing it up. As soon as you make a change to the contents of a bin, a diamond appears after the name in the itle bar. You can save the bin by choosing Save Bin from the File menu, or by closing the bin window. Go to the settings pane in the Project Window to choose how often bins get backed up. The place on the hard drive where these backups go is known as the Attic.
The Project window
The equivalent of Final Cut’s browser. This is where you can find your bins – which in turn hold the clips and sequences. The Project window also has a tab to access the user-defined preferences that are stored in your User Profile.
Although you cannot have more than one project open at a time, you can get access to the contents of another project’s bin. To use a bin from another project, choose Open Bin from the File menu. This adds a link to that bin. Bins that are in other projects are shown labelled with italic text. If you open those bins and make changes, those changes will be reflected in the project the bin came from when you next open the project. If you want to use a clip or sequence from another project in the current project without modifying the original use a copy of the clip or seqence. To get a copy, Option-drag them from the linked bin to a bin in your project.
If you delete a bin or clip in your Project window, a Trash icon appears. That creates a Trash folder within your project folder on your hard drive. This means you can get those deleted items back if you need. Once you empty that trash, the trash icon (and the folder on your hard drive) is deleted.
Bin windows
Bin views are similar to Final Cut. You can view as a text or icon. The icon view is called Frame View. There are three forms of text list: Brief, Text and Script.
Brief View shows the name of the clip
Text View shows more information about each clip. The combination of what columns to show is chosen from a pop-up menu at the bottom of the bin window. To set up new combinations, duplicate an existing setting in the Bin section of the Settings tab of the Project window. Then choose the new setting from the pop-up menu. Drag the headings to re-order the columns. To sort the list based on the content of a specific column, select it and press Command-E.
Frame View – like Icon view in FCP. To change the size of the thumbnails, Command-L enlarges, Command-K reduces (this shortcut also applied to the height of sleceted tracks in timeline). Like FCP, you modify the poster frame of the clip. Instead of Control-Shift to scrub the clip, you can use the various ‘transport’ keys to wind, rewind and play each clip in the Frame window. Where you leave the clip, that’ll be the reprsentative frame shown in the bin.
Like FCP, Command-A selects all clips. More arrangement options are available from the fast menu at the bottom left of the bin window (or from the Bin menu).
Script View – Frame plus Text view. Each clip has it’s representative frame with the columns from the Text view to the right – with space below for script notes.
The Composer window and creating sequences and adding clips to them
FCP’s Viewer and Canvas windows are combined together in Avid as the Source and Record ‘monitors’ in the Composer window.
You can load up to 22 clips into your Source monitor. Select the clips you plan to use in your bin. Drag them to the Source monitor of the Composer window. You can access any one of the the clips you dragged by selecting it from the pop-up menu containing the current clip name. The entries in the menu are usually in alphabetical order, if you hold down Option while choosing the menu, they appear in the order you loaded them into the Source monitor. As you load up more clips from your bins (by double-clicking) they become available in the pop-up menu – which shows the 22 most recent clips you’ve worked with.
With a clip in the Source monitor, you can set In and Out points using the I and O keys. You can also use E and R. This is probably for cater for both left and right-handed editors. To play from the In to the Out point, press 6 (instead of Shift-\).
To create a new sequence in your Record monitor, choose V to Splice (Insert) or B to Overwrite. This automatically puts the content of the clip from In to Out onto a new Sequence in the timeline window. If only one bin is open, the new untitled sequence is put in the currently open bin. If more than one bin is open, a dialog box pops up, asking which bin you’d like your new sequence to appear in. You can rename it once it appears in the bin. The name of the sequence in the timeline appears in the top right of the the Composer window.
You can set In and Out points in the timeline using the I/E and O/R keys too. To toggle between the Source pane and the Record pane, press the Escape key.
The Timeline window
The timeline dispay automatically fits the full sequence to the window. When you add your first clip or clips, Avid adds a Video, two Audio and a Timecode track to your timeline. The timecode track appears at the bottom of the sandwich of tracks. To make it appear on the top, as it does in FCP, option-drag it’s title.
The label for each track in the sequence is known as the ‘record track button’ – the tracks listed to the far left of the timeline are a list of tracks found in the clip in the Source monitor. The tracks to the right of them (V1, A1, A2) are a list of the tracks in sequence loaded into the Record monitor.
With any track selected (including the timecode track), you can make it’s height larger and smaller using Command-L and Command-K key combinations.
You can add and remove tracks from the sequence in the timeline by choosing commands from the Clip menu (!)
Command-click to snap the playhead to head frames of edits. Command-option-click to snap to tale frames of edits. Snapping in FCP usually only applies to the head frames of edits – the first displayed frame of the new clip.
D key to clear your in point (not Option-I)
F key to clear your out point (not Option-O)
G key to clear in and out points (not Option-X)
Z key to delete and replace with filler (not Delete) – known as ‘Lift’
X key to delete a clip and tighten up (not Shift-Delete) – known as ‘Extract’
T to set the in/out to the extent of the current clip (not X)
Delete key deletes the currently selected track!
Tracks are locked and unlocked by clicking the track name. Tracks are turned off and on (made visible or audible) by clicking the button to the right of the track name. If a source clip has some audio that you don’t want to have spliced into or overlayed onto your timeline, disable the audio tracks by clicking the track name.
The transport keys are the 1 key and 2 key to go backwards 10 and 1 frame, the 5 key to play, 3 and 4 to go forwards 1 and 10 frames. You can also play and stop using the Space bar and the ~ key. Caps lock gives you digital audio scrubbing (when you move to a frame, the audio of just that frame is played) when controlling through using 1-5, ~ keys and the space bar.
Avid also uses the J, K and L keys to play fast and in slow motion in both directions – just like Final Cut Pro. The J, K and L keys play sound at the same speed the video is playing. When you use them to play video fast or slow, Avid adds the frame rate that it’s playing to the button in the Composer window.
It’s best to get used to using the spacebar, ~ key and 5 key for Play/Pause to move through your video. Save the L key for setting edit points when you are in trim mode.
Avid and modes
The Avid system is based around the Composer and Timeline having different modes of operation. If you want to add your clips to your timeline, you stay in Source/record mode, the default mode.
If you want to refine your edits, you go into Trim mode. In trim mode the buttons in the composer window change, and clicks and drags in the timeline have different effects.
In Source-Record mode, you cannot directly drag clips in the timeline from place to place using your mouse – you must use one of the ‘segment’ modes, more of which later.
Trim mode
Most Final Cut users trim the clips in their sequences using the Roll, Ripple, Slip and Slide tools. With Avid these operations are done in Trim mode. There is a trim window in Final Cut, but people say that the features of FCP’s trim window don’t macth up to those of Avid’s trim mode.
To go into trim mode, press the U key.
When the Composer is in trim mide, you can set your pre-roll and post-roll in the trim window. Dual roller mode is default – a mode similar to choosing the Roll tool in FCP.
Whether you are rolling, rippling, slipping or sliding, there are four ways to move your edits:
You can drag the edit in the timeline directly (frame counts update between monitors the number of frames edit has moved + for later in time, – for earlier in time).
You can trim using single frames and ten frames in either direction using the buttons in the composer window or their keyboard shortcuts
You can trim using + and – on numeric keypad followed by number to enter exact amounts.
If you move backwards and forwards using the J-K-L keys. This works in the same way as ‘dynamic’ trim mode in the FCP trim window: when you press the K key or release the J or L key, that will be the new location of your edit.
Roll and ripple edits
Trim mode starts off in a state ready to do what FCP users would call a roll (the R key in FCP) – this is known as ‘dual-roller mode.’ Trimming using one roller per track the equivalent of using the ripple tool in FCP (RR). In trim mode you can change to ripple mode by pressing P to ripple the outgoing clip (known in the documentation as the A-side), and the ] key to ripple the incoming clip. To change back to dual-roller mode, press the [ key. Or, like FCP, click the source or the record monitor to choose what to ripple. You’ll see the rollers around the current edit show which clips will change if you edit.
Slip and slide edits
To go into Trim mode ready to slip a clip, drag a lasso from right to left to surround your clip. To slide a clip, first hold down the option key, then drag a lasso from right to left around the clip you want to slide.
In trim mode you cannot move the content of a clip (slip) or move it relative to it’s neighbours (slide) by dragging in the middle of the clip. You must drag on one of the rollers, or use one of the other three trim methods listed above.
Staying in trim mode
Once you are in trim mode, you can move from edit to edit, setting the rollers to make the changes you want.
The S key moves the trim controls to the next edit (Instead of up-arrow key in FCP) A for previous edit (Instead of down-arrow). If you aren’t in the trim mode, pressing these keys will take you into trim mode. This mode switch can be irritating. The FF and REW buttons in the composer window can be set to jump to the previous or next edits in the timeline without going into trim mode (go to the FF/REW tab in the Composer settings section of the settings tab of your project window). You can also assign keyboard shortcuts to FF and REW too. There’ll be more about changing settings and keyboard shortcuts later.
To change which sides of edits are trimmed, you can add or remove rollers by shift clicking where you want to have a roller (like option clicking with the ripple tool in FCP). You can also select nearby edits in different tracks by shift-clicking the ‘record track buttons’ (the label for the track) in the timeline.
Segment modes
FCP users are used to grabbing clips and moving them around, sometimes leaving copies, sometimes wanting the space used by a clip to be removed and for the rest of the clips in the track to slide back to use up the space. Operations like this are done in a pair of modes called ‘Lift/Overwrite’ and ‘Extract/Splice in’
Lift/Overwrite
This lets you drag clips around as you would do using the selection tool in FCP.
To get into this mode, click the red arrow at the bottom of the timeline window, or hold down the option key and drag a selection lasso around the clips you want to move.
Once you are in this mode, you can click more clips to work with.
If you want to move a clip to a different track without moving it up or down the timeline, hold command.
Extract/Splice in
This is the Avid mode for making swap (or shuffle) edits. In Final Cut you do these by dragging in the top third of a clip, only once you start dragging you would then hold the option key down and move the clip to the new place on the timeline.
To get into this mode, click the yellow arrow at the bottom of the Timeline window, or drag a lasso from left to right around the clip(s) you want to move.
If you want to move additional clips, shift-click them.
Drag the selected clips. In this segment mode, the clips are ‘extracted’ from where you start dragging and ‘spliced in’ where you stop dragging. In Final Cut terms your clips are ‘ripple cut’ (Shift-X in FCP) from where you start, and ‘paste inserted’ (Shift-V in FCP) where you stop dragging.
More about segment modes
To make sure your destination for your clips is between other clips, hold down the command key as you drag to snap to edit points.
If you want to mark in/out points to match more than one clip, you can also enter one of the segment modes, click the clips you want to set in/out points around and press the T key (or press the Mark Clip button).
You can also delete any clips you have selected by pressing the delete key. The clips selected do not need to be adjacent. In ‘Lift/Overwrite’ segment mode, the clips are replaced with filler. In ‘Extract/Splice in’ segment mode, the clips are replaced with the content further along the timeline (changing the overall duration of the sequence, and possibly losing sync)
How to make a clip offline
Sometimes Final Cut Pro editors like to make clips offline, usually so that they can be recaptured at a higher resolution. In Avid terms this is is known as ‘unlinking’ the clip. There is no ‘Unlink’ in the Bin menu, but there is a way to change ‘Relink…’ to ‘Unlink’
If you want to make a selected clip offline, hold down shift and command(i.e Apple), go to the ‘Bin’ menu and choose ‘Unlink.’

Alternatively, if you have a two button mouse, hold down command and right-click the clip and choose ‘Unlink’ from the contextual menu.
Autosave compared with the Avid Attic
The equivalent of Final Cut Pro’s Autosave feature is the ‘Avid Attic.’ In Final Cut, the whole project is saved every few minutes. You choose where these backups are stored using ‘System Settings’ in the ‘Final Cut Pro’ menu:
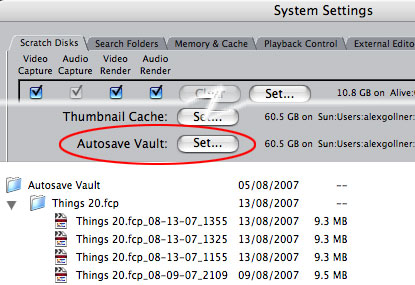
With Avid the backups go to a specific place ‘/Users/Shared/name of Avid software/
Avid Attic.’ The Avid Attic is where your project’s bins are backed up. The bins are only backed up to the Attic if there have been any changes. Within the Attic, the organisation is ‘Avid Attic:Project Name:Bins:Bin Name:Bin Title.n’ (where n is a different number for each backup):

In this case, the ‘Marconi Bros AG’ project was moved from a Media Composer to an Xpress machine. Since the move only the ‘Sequences A’ and ‘Takes’ bins have meed modified – therefore only they have been backed up to the Avid Attic.
This means that you can go back to earlier versions of some of your project without losing recent changes to the rest of your project. To recover older versions of bins, you have two options, depending on if you want to completely revert to the way the bin was, or if you need to access a clip or sequence in the backup while keeping the bin as it is.
To replace the bin with a backup, rename the filename extension from ‘.n’ to ‘.avb’ and replace the current file in the project folder.
To have access to both the current and older version of the bin, you need to rename the backup bin with a different name as well as change the extension to ‘.avb’ – then copy the bin file to your project file.
Due to a bug in some versions of Avid (including Media Composer), it isn’t possible to have both the current and backup version of a bin open at the same time in Avid. Even if you have renamed the backup bin, Avid can’t display the contents of both bins at the same time. To get around this you can have the window of the backup bin open and drag the clips and sequences you want to the icon of the unopened current version of the bin. Once you close the window of the bin copied from the Attic, you can open the current version of the bin and continue to work.
As Avid only autosaves the bins that have changed in your project, you should also have a policy of backing up the other files and folders kept in the project folder to a backup drive (not the media drive).

Pingback: Which ever you think is best… I’ll agree with you « Editing organazized
I think the last bit of the “Lift/Ovewrite” section didn’t get saved. The last two words tthat are missing seem to be; “your breath.”
Thanks Jurgen, the words should have been ‘hold command.’
Thanks. This is very good. I work in both, but as I started in FCP, it’s taken me a while to get up to speed with the Avid, a very good program indeed.
Un millon de gracias, desde chile.
bye
Hi Alex, just stumbled across your blog. Some really useful advice here and as a regular Underground user I also found the maps you’ve designed really interesting.
Pingback: > learn the avid « celluloidhope
Alex,
Excellent work. And much needed! I could have not make the transition to Avid without your help. You should write a full on book!
Keep up the good work.
I would add to your blog that the fastest way to get into trim mode is by lassoing the transition and how trim mode operates differently wether you are working with or without sync locks on. Also the added benefits of making sure that dual image play is clicked on in your settings.
Also, I forgot, mapping transition corner display into your trim window interface and the benefits of using that function. Okay, I’m done.
This has been so helpful. This pretty much could be the definitive primer for FCP to AVID transitioners.
Thanks Alex!