Final Cut Pro X: Create timelines at any resolution and frame rate
The current version of Final Cut Pro X provides a limited range of resolutions and frame rates for projects.
This post shows how to edit timelines at any frame size and frame rate. Frame rates that Final Cut Pro X can edit and export range from less than 1fps to at least 1200fps:

The trick: Create the timeline in a composite clip stored in an event.
Final Cut Pro X can open any QuickTime clip in its own timeline. Once you add effects, clips, transitions and titles, you can use the share menu to export the timeline as a QuickTime movie.
Odd footage
If you have footage at the size and frame rate you want to edit and export…
- Import the footage into an event.
- Duplicate the clip using the Duplicate Clip command from the File menu
- Use ‘Open in Timeline’ from the ‘Clip’ menu (or select it from the context pop-up menu by control- or right-clicking the clip).
- Edit away in Final Cut add other clips to the timeline
- Export a QuickTime file using the Share menu as normal.
Odd timeline for standard footage
You need to create a clip at the frame size and rate you want your odd timeline to be.
You can do this in Adobe Photoshop, QuickTime Player 7 Pro or MPEG Streamclip. I’ll use MPEG Streamclip in these instrcutions as it is a free download from Squared 5.
MPEG Streamclip can take any .jpg image and export it as a QuickTime movie. The content of the .jpg doesn’t matter, when you first open the movie in the timeline, you can delete the image once you start editing.
If the resolution you want is smaller than 2048 by 2048, then start MPEG Streamclip and open any .jpg image. Choose File -> Export to QuickTime and select the dimensions and frame rate you’d like:

In this case the original (unscaled) size of the .jpg file was 231 by 319 pixels. The exported QuickTime will be a single frame 2048×512 movie that ‘plays back’ at 120fps.
If the resolution you want is more than 2048 by 2048, then you’ll need a source .jpg image at the correct size to import into MPEG Streamclip.
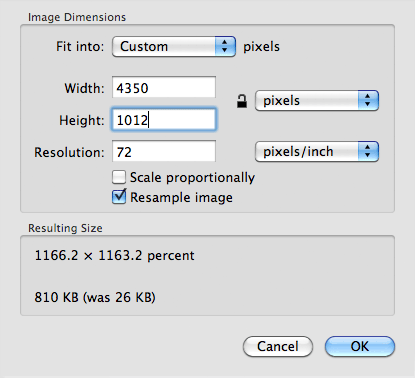
Open any .jpg image in Preview. Use Tools -> Adjust Size to set the dimensions you need:

Save the .jpg with a new name. Start MPEG Streamclip and open your .jpg. When you use Export to QuickTime, select the ‘unscaled’ option along with the frame rate you want:

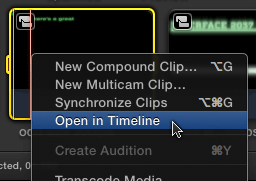
Once you have your 1-frame QuickTime movie, import it into a Final Cut Pro X event. Control- or Right-click it and choose ‘Open in Timeline’ from the pop-up menu:

Add some content to the timeline, such as a title. Go to the first clip in the timeline, which will be the source image you imported into MPEG Streamclip with a duration of one frame. Delete it.
Editing the timeline of a clip converts it into a Compound Clip. Compound clip timelines can be exported as QuickTime movies using the Share menu as normal. You can rename the clip at any time in the event and use File -> Duplicate Clip to make backup copies.

You can also use motion 5 to do this.
Ah! This has been one of my lingering frustrations in FCPX, especially when working with .r3d footage. Great tip!
Pingback: Editing With Custom Resolutions & Frame Rates in FCPX | Premiumbeat.com
Thanks Alex. So if I shot something in 60p to be able to do extreme slow motion fx on certain parts, and yet have the remainder of the shots that are in real time have the look of 24p, I could technically use this to convert the footage into24p format in the timeline and still be able to stretch out certain parts? Thanks.
I would still use a 24p timeline. To have a a slower shot, you would use the 60p shot and choose ‘Conform Speed’ from the retime menu. This takes that 60 frames per second and plays them at 24p. You can choose slower speeds using that same menu and choose Optical Flow from the Video Quality sub-menu.
I am trying this as I need to create a large size video 784 x 3328. But I am totally new with FCP X. Is it right that I cannot create a project with that size, but have to stick with the dummy I created in order to work and edit?
You can use this method to create a 3328 wide by 784 timeline.
Once you export your timeline, I imagine you’ll need to divide it up into smaller movies. You can use Apple Compressor to crop the edges of the exported movie to the correct size.
You bloody genius! What a ridiculous fix, as if Apple have made something so lacklustre. I’m trying the swap from FCP 7 to FCPX and regretting every moment of it; some features are appealing, and the aesthetic overhaul is a refreshing modernisation, the package feels as lifeless as a melted rubber duck.
Thanks a lot ! Working good !
FCP X imports HD video and changes aspect ratio from 16:9 to anamorphic. Can I fix it?
I just keep crashing on import…
Stupid Apple.
This does not appear to work on the latest version of FCPx, shame. Now it demands I conform the clip to an “acceptable” format.
Alex, I am working on a series of videos comprising stills, video clips, music & voiceover in FCPX. The first two went fine but the latest one won’t allow me to master the project as before. The first two were done at 30 fps & at 1920 x 1080. The latest one will only let me master at 29.97 fps & 960 x 540. The quality is noticeably poorer than before. How can I alter the frame rate & pixel count of this latest project?
Causes FCPX to crash on import.
The one-frame clip may cause a crash if it is not created in MPEG Streamclip with the same framerate – i.e. 23.98, 24, etc. that FCPX is set up in.
It certainly crashes on import, but if you drag the file from the Finder to any given timeline, it will import just fine.
Could you explain how to create an 18 fps timeline ( project ) in FCPX 10.1 !?
Create an 18fps movie in another application, import it, control-click in an event and choose “Open in Timeline”