Archive

final cut pro

This tip shows you how you can make Final Cut Pro and Final Cut Express have more blurred edges to some of the transitions. Some video transitions have a blurred edge option. You get this by setting a border thickness and checking a box marked ‘Feather.’ The amount of blurriness is based on how thick you’ve set the border.

The problem is that the maximum border thickness for Final Cut is 100, which means that when the border is feathered, the blurred edge of the transition isn’t very wide. This screenshot shows how thick an unfeathered border is when it is set to 100:
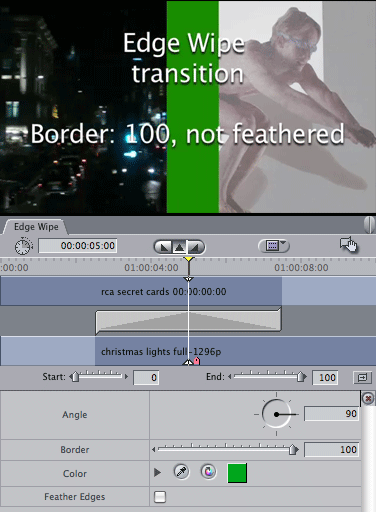
feathery11

Transitions in Final Cut are implemented in a simple programming language called FxScript. In this tip, you’ll open the code for a transition, make four simple changes to produce a new transition that allows the border to be set to any value you want.

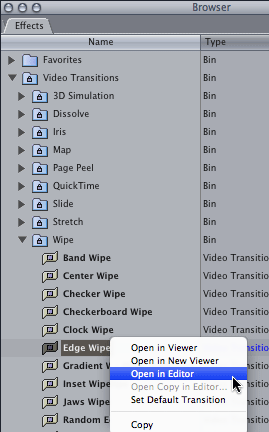
1. To edit the code for a transition, open the Video Transitions section of the Effects Tab and Control-Click the ‘Edge Wipe’ transition. Choose ‘Open in Editor’ from the pop-up menu:
feathery-screen-shots_1

2. Edit the text:
feathery-screen-shots-2a

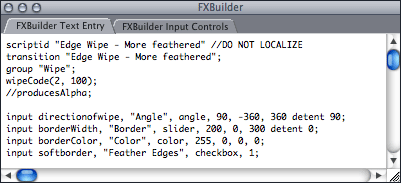
a. Change the first two lines so that ‘Edge Wipe‘ says ‘Edge Wipe – More feathered‘ – this ensures that the new plugin you’ll be creating will appear in Final Cut with a different name.

b. The next line you’ll change is the line of code that creates the Border slider.

Change
input borderWidth, "Border", slider, 0, 0, 100 detent 0;
to
input borderWidth, "Border", slider, 200, 0, 300 detent 0;

Instead of the slider defaulting to a border of 0, it defaults to a border of 200. The maximum value will now be 300 instead of 100. You can set these values to anything you want, but this is what worked well for me.

c. Change
input softborder, "Feather Edges", checkbox, 0;
to
input softborder, "Feather Edges", checkbox, 1;

This makes feathering the border the default. If you choose this transition instead of the normal one, it is likely that you will want the border to be feathered.

The script for your new transition should look like this:
feathery-screen-shots-2b

3. Now you’ll make your new plugin. Choose ‘Create Plugin…’ from the ‘FXBuilder’ menu. Enter ‘Edge Wipe – More Feathered.txt’ as the file name. Save it in Your Startup HD/Library/Application Support/Final Cut Pro System Support/Plugins

4. Quit and restart Final Cut. You’ll then be able to use your new transition in the same way as any standard transition: from the the Effects tab of the Browser or from the Effects Menu:
feathery21

Here are Edge Wipe and Edge Wipe – More feathered in action:

You may need to play this twice due to a playback bug on Vimeo that affects short videos.

Of course this works for any transition that has a feathered border option such as the Irises and most of the Wipes. If you’d like thicker borders on the 3D Simulation, Stretch and Slide transitions, you can change the maximum value of their input sliders.

Visit my Final Cut home for more plugins and tips
finalcuthomethumbnail

You may know that you can switch between sequences in the Timeline and Canvas windows using the shortcuts for selecting the previous tab Command-Shift-[ and the next tab Command-Shift-]

tabs_1_sequence

You may not know that you can also do this in the Viewer as well.

To open a clip from the timeline, you can press return.

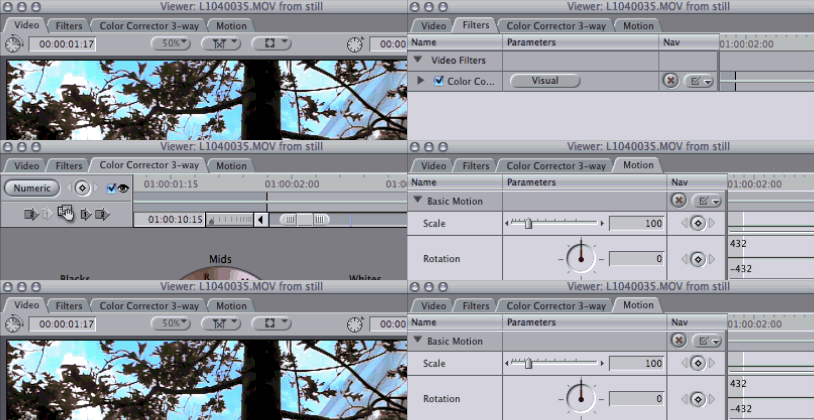
To switch between the Video, Audio, Filters and Motion tabs from the keyboard, use the same shortcuts.

You can bring up the Motion tab while looking at the Video tab by pressing Command-Shift-[ in the example below, you can switch from the Filters tab to the Color Corrector 3-way tab by pressing Command-Shift-]

tabs_2_viewer

Over at the LAFCPUG forum, Casey Petersen asked if it was possible to change the default colour of the ‘color’ matte generator. Not directly, but you can create a new generator plugin with a different default colour:

1. Open FXBuilder from the tools menu.
2. Paste the following text into the Text Entry window:

scriptid "Color";
generator "Color - white", 120;
group "Matte";
input fillcolor, "Color", color, 255, 255, 255, 255;
InformationFlag("dontEraseDest");
InformationFlag("bypassCache");
code;
channelfill(dest, fillcolor.a, fillcolor.r, fillcolor.g, fillcolor.b);

3. Choose ‘Create Plugin…” from the FXBuilder menu
4. Enter “Color – White” as the name
5. Save it in
Your Startup HD/Library/Application Support/Final Cut Pro System Support/Plugins
6. Restart Final Cut and you’ll have a new generator which produces a white matte by default.

Note that this won’t be broadcast safe. It might be better to use a different value in the script such as

input fillcolor, "Color", color, 255, 230, 230, 230

instead.

Here is my next plugin: A generator that takes a clip and animates it from one place to another. It defaults to moving the clip from off the bottom of the canvas to off the top.

I came up with this when creating closing credits for a film partially funded by the Arts Council of England (using another of my plugins: Closing Credits). One of the conditions of funding was that their logo appears during the end credits scroll. Oddly enough, it is not straightforward to animate objects in Final Cut to move at specific speeds.

move_01

Download Alex4D Move
Download: Alex4D Move.

Copy the ‘Alex4D Move 1.01.fcfcc’ file into one of two places on your computer:

Your Startup HD/Library/Application Support/Final Cut Pro System Support/Plugins
or
Your Startup HD/Users/your name/Library/Preferences/Final Cut Pro User Data/Plugins/

(Your Startup HD/Users/your name/Library/Application Support/Final Cut Express Support/Plugins for Final Cut Express users)

Restart Final Cut, and you’ll see the generator in the ‘Animate’ section of ‘Video Generators’

Here’s a long (20 minute) video showing how it works:

Here are some magic numbers for entering into the dimensions values for video clips:

NTSC: 640 wide by 480 high
NTSC widescreen: 853 wide by 480 high (?)
PAL: 768 wide by 576 high
PAL widescreen: 1024 by 576
720p: 1280 by 720
1080p: 1920 by 1080

Visit my Final Cut home for more plugins and tips
finalcuthomethumbnail

If you want a clip to move smoothly and then stop, use the ‘Keyframe % Complete’ animation method. You can then set a value of 0 at the start of the generator, and 50 when you want the image to stop moving (if you want the clip to end up halfway across the screen). Control-click the second keyframe in the graph to smooth it so that the image smoothly slows down to a stop:

Getting the clip to move at the same speed as something else will take some trial and error. You could add some keyframes between 0 and 50 that produces a straight line segment of the animation graph which makes the clip move at a constant speed. The angle of the straight line defines the speed.

You could duplicate a copy of the generator and use the fixed speed method to animate, and use the position of the copy to help set the keyframes.

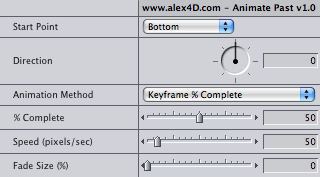
To go with my closing credits plugin, I’m working on a filter that animates objects across the screen. It defaults to animating them from off the bottom of the screen to the top of the screen. This will be useful if you need to include logos or moving video in your end credit scrolls.

animatepastui

To make it more useful, it’ll also animate from the other edges of the screen or an arbitrary point in an arbitrary direction until the clip is off the edge of the screen.

Sometimes working on low-budget projects means leaving the initial edit to others. Researchers sometimes already have plans for the footage. Producers might not have the funds for all your editing time.

That means preparing the way for a paper edit. You send the footage to someone else who sends you back an initial edit as a document listing a series of timecodes indicating what footage goes where:
[01:47:22]-Mr. Thomas: "That's when we decided to extend the name of the club using the initials of the new members..." -[01:48:12] "...as to who the second 'A' was."
[02:12:01]-Mr. Yankson: "I thought it a demotion..." -[02:12:56] "...the Muddy Lawn."

They usually refer to hours minutes and seconds, because the specifics of frames don’t apply to paper edits.

How do they know what timecode to put in their documents?

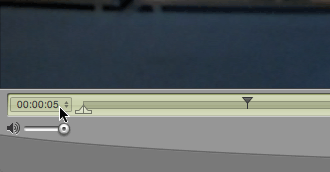
The simplest option is to use QuickTime player. The time shown in the bottom-left of the window usually shows the number of minutes and seconds counted since the start of the movie:
timecode_qt

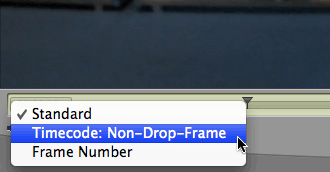
If you move the mouse over this counter, it changes into a pop-up menu where you can choose to display the source timecode of the movie (the timecode used within Final Cut, Avid or Premiere):
timecode_qt2

timecode_qt3

If the person who is doing the paper edit refers to this time, you can use it within your editing software: “Use the third time the guard opens the cell door [from 36:28 until 36:42]”

If you are not sure of whether your collaborator will have access to QuickTime player, or if they require footage in another format, it is better to add timecode to the video itself:

This is known as a “timecode burn”.

The most straightforward way in Final Cut Pro is to use Andy Mees’ Timecode Generator plugin. Before you add it to your timeline, enter a value for duration at least as long as your timeline:
timecode_d

Download it from his page (by clicking the screenshot at the top of the page).

Another option is to use a separate application to add a timecode burn to your movies: QT Sync. It was originally created to fix QuickTime movies whose audio and video are out of sync. It has an option to add timecode to existing movies. This can be useful if a movie takes a long time to render, and you want a version without a timecode burn:

So there I was working on someone else’s rig when I noticed all the pretty colours on the timeline. They reminded me of old Final Cut render errors, when it didn’t update the timeline window properly.

I guessed it was to do with using the same footage multiple times in a timeline and wondered why my friend had that option on. I thought you’d only want to use it on film projects. It turned out that he found it useful when making conference videos. If you need to shoot, edit and encode a video in a single day, it is very handy.

You can use it to see if you’ve used the same shot twice by mistake. You can also see if you’ve included all the shots requested for a montage. All good if there’s no time to label every clip clearly.

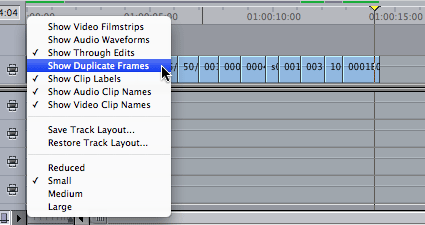
To see which bits of footage are used more than once in your timeline, choose ‘Show Duplicate Frames’ from the Timeline Layout Popup:

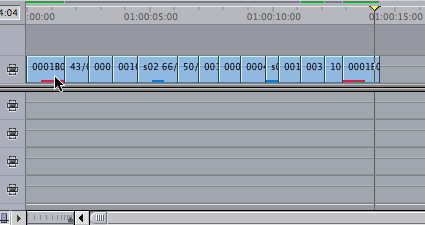
This shows that two bits of footage are used twice in the sequence:

Up to seven colours are used to show dupe frames, if seven clips were used twice you’ll see the eight repeated clip will be marked in red.

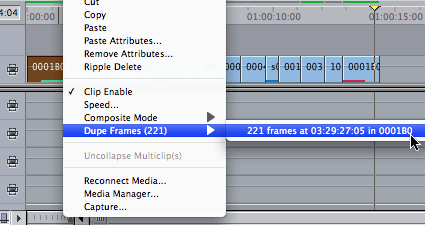
You can also right- or control- click a clip to jump to the point in the timeline the duplicate frames are used:

Choose the Dupe Frames submenu and choose an instance of where the frames are used and you’ll jump to that point in the timeline.

This means you can jump to each instance of a clip you’ve used in a sequence. Quicker than using the Find command in the timeline. Adding some frames of all the clips you want to find to a sequence will quickly show you if any clips you are looking for aren’t in the sequence. In this example, the first and fourth clips don’t have any frames duplicated in the clips pasted on the end of the sequence:

The clips pasted at the end could be the clips chosen for a montage of the earlier clips. In this case two clips would be missing from the montage.

Visit my Final Cut home for more plugins and tips
finalcuthomethumbnail

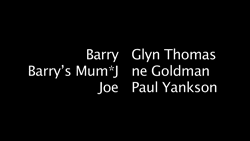
If you want to use the ‘*’ character to create centred, movie-style closing credits, you cannot use any character with an ASCII value above 127 on the left-hand side of your credit list. If you do, the position of the * is determined incorrectly meaning that the centering doesn’t work, a character vanishes and the * remains.

This due to a bug in the ‘FindString’ fxScript function, the interpreted language that implements the generator.

The only likely 8-bit ASCII character you’ll want to use is the possessive closing apostrophe – as in Barry’s Mum*Jane Goldman which produces this result:

If you use
£££££££££££££To the left*To the right
as your text in ‘Scrolling Text’ you get:

If you’ve been having these problems with Scrolling Text, my alternate free plugin might help.

Download Alex4D_scrolling_text_v1.01

Download Alex4D_scrolling_text_v1.01.

Put the ‘Scrolling Text v1.01.fcfcc’ file into

Your Startup HD/Library/Application Support/Final Cut Pro System Support/Plugins

or

Your Startup HD/Users/your name/Library/Preferences/Final Cut Pro User Data/Plugins/

Restart Final Cut, and you’ll see a new generator in the ‘Text’ section of ‘Video Generators’

If you are scripting, if you are using FindString to find a single character, you can use the following routine instead:

on myFindChar(string stringToSearch, string charToFind)
float pos, stringLocation
string chartotest

stringlocation = kUndefined

pos = length(stringToSearch)
repeat while (pos > 0)
pos = pos – 1
CharsOf(stringToSearch, pos, pos+1, chartotest)

if (chartotest == charToFind)
stringLocation = pos
end if
end repeat

return(stringLocation)
End

Which you use with the following snippet:
index = myFindChar(curline, "*")

…which looks in a string named curline for an asterisk and assigns it’s position to the float named index.

Note that my programming is a little rusty, so this script might not be able to deal with every input possibility.

Visit my Final Cut home for more plugins and tips
finalcuthomethumbnail

The Final Cut user interface is still active when in Digital Cinema Desktop Preview mode. That means you can still control Final Cut with directors and producers watching without the distractions of the software getting in the way.

As well as using keyboard shortcuts to control playback, you can also control-click locations on the screen where you know the current timecode is being displayed in order to jump directly to specific markers.

To see the video I used as a sample, visit the mini site it was made for.

Some editors think it best to get a feel for the correct point for the In and Out of each clip while the clip is playing. As it is quicker to release a key than press a key, in Final Cut, the In point is set when you release the ‘I’ key and the Out when you release the ‘O’ key.

Whether the video is playing forwards or backwards (J key or Shift-space), you can set these points without tapping the keys.

Alternatively, you can do the same by holding your mouse down on the Mark In or Mark Out buttons until you are happy.

Again, this is from the manual, but when I last looked at this section, it said tapping I or O was the way to mark in and out.