Archive

final cut pro

Following a request over at The LA Final Cut Pro User Group forum, I’m working on a transition plugin that gives you more control on the response curve as one clip fades into another.

Part of that job is finding a way to give feedback on screen showing the response curve. Here’s what it looks like at the moment:
Screenshot of FXBuilder showing the result of a plugin I'm writing

I’m also working on a transition plugin that will produce the ‘Scooby Doo going back in time’ effect amongst others:

Using a similar method as I used to turn the ‘Pond Ripple’ filter into a transition, I’ve come up with a transition that does the same with the ‘Ripple’ filter.

One clip rippling into another

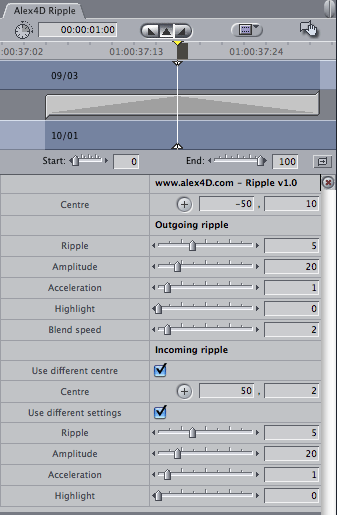
I’ve also added some extra controls so that the amplitude, wave length and speed of the incoming ripples can be different from those of the outgoing clip:
Controls for Alex4D Ripple transition

Here is a clip showing how the transition works and showing that small parameter changes produce big differences in the result:

Download Alex 4D Ripple transition
To use this plugin, download the ZIP document, copy the ‘Alex4D Ripple transition v1.fcfcc’ file to

Your Startup HD/Library/Application Support/Final Cut Pro System Support/Plugins

(Your Startup HD/Users/your name/Library/Application Support/Final Cut Express Support/Plugins for Final Cut Express users)

‘Alex4D Ripple’ will appear in the ‘Dissolve’ video transition category.

Visit my Final Cut home for more plugins and tips
finalcuthomethumbnail

On a recent job I found myself creating a vignette shape in Photoshop because the Vignette filter in Final Cut wasn’t flexible enough for me.

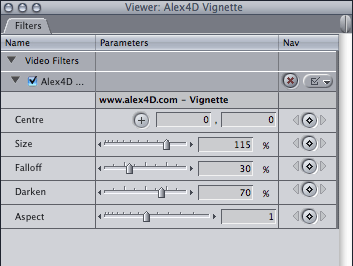
Here’s a new free plugin the gives you control over the position and aspect ratio of the vignette. That means you can direct the audience’s view and even use it for irising effects:


vignetteui

Unlike the Vignette filter that comes with Motion (and appears in Final Cut Pro), my filter doesn’t have the option to blur or desaturate the darkened area. An upside is that this should work in Final Cut Express, although I don’t have a copy to test it on.

Download Alex 4D Vignette

To use this plugin, download the ZIP document, copy the ‘Alex4D Vignette.fcfcc’ file to

Your Startup HD/Library/Application Support/Final Cut Pro System Support/Plugins

(Your Startup HD/Users/your name/Library/Application Support/Final Cut Express Support/Plugins for Final Cut Express users)

‘Alex4D Vignette’ will appear in the ‘Stylize’ filter category.

If you want a lot more control over your vignetting, visit Natress and check out their G Vignette plugin – it’s part of a large plugin set that costs less than £75.

Visit my Final Cut home for more plugins and tips
finalcuthomethumbnail

As I’ve been using Adobe After Effects over 10 years or so, it’s difficult to move over to Apple Motion, even though I haven’t upgraded my copy of AE past 6.5.

One of the things to watch out for in Motion is that you cannot change the frame rate of your project once you create it. A current project required an animation that works at 25 and 29.97 frames per second. You can always change the frame rate in After Effects, but I wanted to use the particle presets in Motion.

The way to generate animations at both frame rates is to set the frame rate to a multiple of 25 and 30 – 150fps:
motion150fps

Motion always tries to play projects at their full frame rate, but degrades well, so you’ll see your animation play smoothly as fast as your computer can play it.

There seems to be a bug in QuickTime export from Motion 3.0.2, even if you choose to export at 25 or 30 or 29.97 frames per second, it will still export at the full frame rate of the project. You need to Export using Compressor to get your outputs at PAL/NTSC or p25/p30.

Given that Final Cut’s scripting language has been around for many years now, it is obvious that it is too complex for editors, and not advanced enough for graphics programmers. There have been a reasonable number of FxScript plugins, but not very many if you consider how many copies of Final Cut are out there.

A few months ago I decided to check out FxFactory, the plugin system from Noise Industries. It gives non code-writers the chance to create their own plugins. Instead of learning Apple’s version of the C programming language and their development environment, people can use Quartz Composer to program their plugins. Quartz Composer is a free application you can install from your OS X DVD. It is used to create user interfaces for applications for Macs and iPhones, screen savers and interactive animations within applications. The effects in Photo Booth are implemented using Quartz compositions. Some VJ software uses them for music visualization.

quartz-composer-ui

FxFactory lets you use these animations as filters, generators or transitions in Final Cut Pro, Motion and Adobe After Effects. They also provide some useful bits of code to use within Quartz Composer to create plugins.

The important thing to understand about this system is that although Noise say that you don’t need to write a line of code to create first class plugins, you’ll still have to learn a kind of programming. You create Quartz compositions in Quartz Composer by adding patches to a layout and linking the outputs of one to the inputs of another.

qc-code

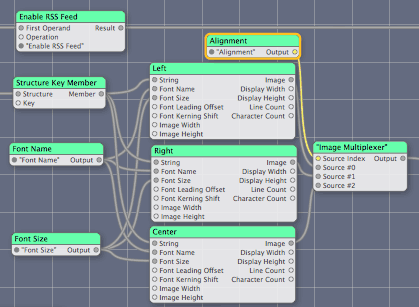
This is a small part of a Quartz Composition that takes an RSS feed and animates the headlines appearing in front of a rotating globe. Here you’ll see an ‘input splitter’ patch selected. This takes the input from a control from the Final Cut filters tab and sends it to other patches. As the control is a pop-up menu for choosing whether the headlines are left, right or center aligned, the input splitter patch sends a 0, 1 or 2 to an ‘image multiplexer’ patch. This kind of patch uses the number on its ‘Source Index’ input to choose which source image to send to its output. Each of the images sent to ‘Source #0’ ‘#1’ and ‘#2’ is generated by an ‘Image with String’ patch, a kind of patch that takes some text (a ‘string’ in programming parlance), some font specs and outputs an image. Each of these patches are named to show what alignment the text they produce will be: left, right or center aligned. As you’d want the text to use the same font and size whichever alignment you choose, the inputs come from the output of splitter patches for font name and font size. The inputs from the controls in the Final Cut filter tab come from these two patches and are split so that they are sent two all three alignment ‘image with string’ patches.

It may not be code writing, but it is still programming. As necessity is the mother of invention, you might discover that needing to produce a specific result is a great incentive for learning how to make it happen.

To see what others have done with Quartz compositions in Final Cut and elsewhere, check out Noise Industries, Futurismo Zugakousaku and Quartz Compositions.

You’ll need to download any .qtz files to watch them in QuickTime player or install them as screensavers to Your Macintosh HD/Library/Screen Savers

Looks like my Closing Credits Pro plugin will be created in Quartz Composer made available to Final Cut, Motion and After Effects users using FxFactory.

I recently noticed that the ‘Ripple Dissolve’ transition works best on quick transitions. If you set the duration to much more than a minute, you can see that the incoming clip fades in – it isn’t distorted by the pond ripples.

My new plugin ripples the outgoing clip as well:
pondripplestripsimple

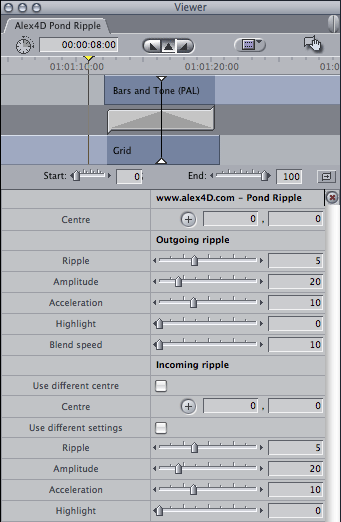
I’ve also added some extra controls so that the position, speed and intensity of the incoming ripple can be different from that of the outgoing clip:
rippleui

Here is a clip showing how the transition works and comparing it with ‘Ripple Dissolve’:

Download Alex 4D Pond Ripple
To use this plugin, download the ZIP document, copy the ‘Alex4D Pond Ripple v1.fcfcc’ file to

Your Startup HD/Library/Application Support/Final Cut Pro System Support/Plugins

(Your Startup HD/Users/your name/Library/Application Support/Final Cut Express Support/Plugins for Final Cut Express users)

‘Alex4D Pond Ripple’ will appear in the ‘Dissolve’ video transition category.

Visit my Final Cut home for more plugins and tips
finalcuthomethumbnail

I made this one by taking the Swing transition and turning it into a filter that gives you keyframe control over animating a clip so that it swings on or off the screen:

swingscreen

Here are the controls:
swingui

This shows the keyframes to make the clip swing slowly away then quickly swing towards the camera.

Download Alex 4D Swing
, copy the ‘Alex4D_Swing.txt’ file to

Your Startup HD/Library/Application Support/Final Cut Pro System Support/Plugins

(Your Startup HD/Users/your name/Library/Application Support/Final Cut Express Support/Plugins for Final Cut Express users)

The filter will appear in the ‘Perspective’ category in the Video Filters section of the Effects tab or the ‘Perspective’ sub-menu of the ‘Video Filters’ sub-menu of the Effects menu (!)

This plugin is in text format. That means you can have a look at the changes I made to the FxScript transition to make it into a filter. I’ve used ‘//’ to comment out the original code that doesn’t apply to filters.

scriptid "Alex4D Swing" //DO NOT LOCALIZE
filter "Alex4D Swing";
group "Perspective";
producesAlpha;

// scriptid "Swing" //DO NOT LOCALIZE
// transition "Swing";
// group "3D Simulation";
// wipeCode(21, 100);

input info, "www.alex4D.com - Swing v1.0", Label, "string" // Added for PR
input angleofaxis, "Swing Angle", angle, 0, -360, 360 detent 0;
input swingAngle, "Swing (%)", slider, 0, -100, 100;
// was input SWING, "Swing", popup, 2, "In", "Out";

Visit my Final Cut home for more plugins and tips
finalcuthomethumbnail

Over at MacVideo there are a couple of videos featuring me attempting not to talk too fast, yet going on for quite a while.

The first demonstrates the problem of Final Cut Pro not being able to use all the fonts installed on a computer and how to use my free plugins to fix the problem.

The second is the first part of an interview with me about how I approached writing my Closing Credits plugin for Final Cut.

More egomania soon…

A handy method for breaking down a long clip in Final Cut is to set markers to indicate the start of interesting shots, and make subclips based on these markers.

Once you have set the markers, you’ll see them listed below the clip in the browser. You can turn these into subclips by dragging them to a bin. In this example, a shot of bus journey through London (‘christmas lights full-1296p’) has five markers, each representing when the bus arrived at each landmark. To divide the clip into subclips that each only have the footage from the named landmark, I dragged the markers to a bin named ‘Christmas lights subclips’:
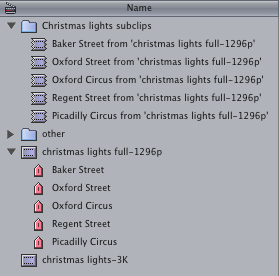
editfcp1d

[Note that usually the subclips in the bin would be listed in alphabetical order, which wouldn’t be useful. To keep the subclips in chronological order, I sorted the Browser by clicking the ‘Media Start’ column]

This is convenient, but the fact that Final Cut adds from ‘christmas lights full-1296p’ to the name of each subclip is a little redundant. The following tip shows how you can edit the Final Cut Pro application itself so that it doesn’t add these suffixes to the names of the new subclips.

Before I explain this tip, I can only tell you that this method worked for me, I haven’t tested it on any combination of software and hardware but my own. This process might damage FCP on your system, so be careful. This operation is a little like the Mac users of 10 and 20 years ago using ResEdit to muck around inside their applications.
resedit

ResEdit was a tool for programmers, and it was easy to blunder around too much and create a fault in the application being modified. That is why the first stage is to make a backup copy of Final Cut, in case the copy you work on crashes or cannot open.

The backup copy is good to have around when the next software update appears. It is possible that changes inside Final Cut will make the upgrade process fail, and you’ll end up without a working copy of Final Cut. Before applying an update, delete your modified ‘Final Cut Pro’ and rename ‘Final Cut Pro copy’ back to ‘Final Cut Pro’

1. Duplicate ‘Final Cut Pro.app’ by selecting it and choosing Duplicate from the File menu or press Command-D (to make a safety copy in case this process goes wrong)

2. Select the original ‘Final Cut Pro.app’

3. Control-click it and choose ‘Show Package Contents’ from the pop-up menu

4. Go to the new folder that represents the contents of ‘Final Cut.app’

5. Open these series of folders within ‘Final Cut.app’: Contents > MacOS > Plugins

6. Select ‘Browser.bundle’

7. Control-click it and choose ‘Show Package Contents’
editfcp1a

8. Open these series of folders within ‘Browser.bundle’: Contents > Resources > English.lproj
editfcp1b

9. In the newly visible ‘English.lproj’ folder double-click ‘Localized.plist’ to open it in ‘TextEdit’

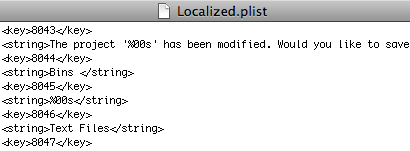
10. Search for string number 8045

11. Change the line below
from
%00s from ‘%01s’
to
%00s

i.e. from
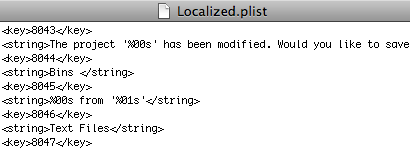
editfcp1c1
to
editfcp1c2

12. Save ‘Localized.plist’

13. Close the Browser.bundle window and the Final Cut Pro.app window.

When you next open Final Cut Pro (version 6.0.4), any new markers you drag from a clip will turn into subclips with no from ‘Clip’ suffix at the end of their names. Note that the string might not be number 8045 in other versions of Final Cut. If it is different in your version, try searching for %00s from ‘%01s’ in ‘Localised.plist’ and change that string.

If you are feeling brave, you could experiment and find the string that adds the word ‘Subclip’ to newly generated subclips based on In and Out points. Try searching for Subclip with a space in front.

Good luck!